Workspaces are saved filters that can be used to organize entries and conduct further analysis. You can access your Workspaces through the Analysis dropdown within the top navigation.
There are 2 main use cases for Workspace:
- Grouping Entries: You can group entries into a Workpace to help with your analysis and report making.
- Collaborative Analysis: You can invite other moderators and clients into a workspace to discuss entries and findings.
Creating a Workspace:
The first step in creating a new workspace involves selecting the entries you would like to include in the workspace by using the various filtering options. Once you have your desired filters in place, click ‘Save as Workspace’ to create a new Workspace.

Once you click ‘Save as Workspace’ a pop-up will appear. Give your workspace a name and a description.
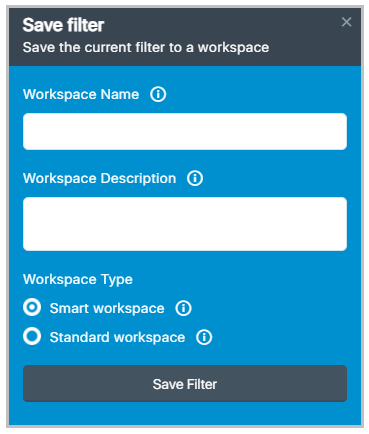
There are two types of Workspaces:
- Smart Workspaces: Smart Workspaces pull in any entry that fits the filtering criteria you selected, even after you create the Workspace. This means if you create a Smart Workspace while participants are still submitting entries, any entry they submit that fits the filtering criteria you selected will automatically get added to the Workspace. This allows you to start organizing data at the beginning of a project, even before any entries have been submitted.
- Standard Workspaces: Standard Workspaces are a snapshot in time. No new entries will get added to a Standard Workspace after it has been created, even if participants continue to submit new entries.

Once you add a Workspace name and description and select a Workspace type, you can click the ‘Save Filter’ button to create your workspace. Once clicked, you will see a notification letting you know the Workspace was created successfully. You can enter the workspace by clicking within the green popup notification.
You can also access Workspaces through the Analysis dropdown in the top navigation. When you select Workspaces through the Analysis dropdown, it will show you the list of Workspaces page, which contains all of the Workspaces associated with that project.

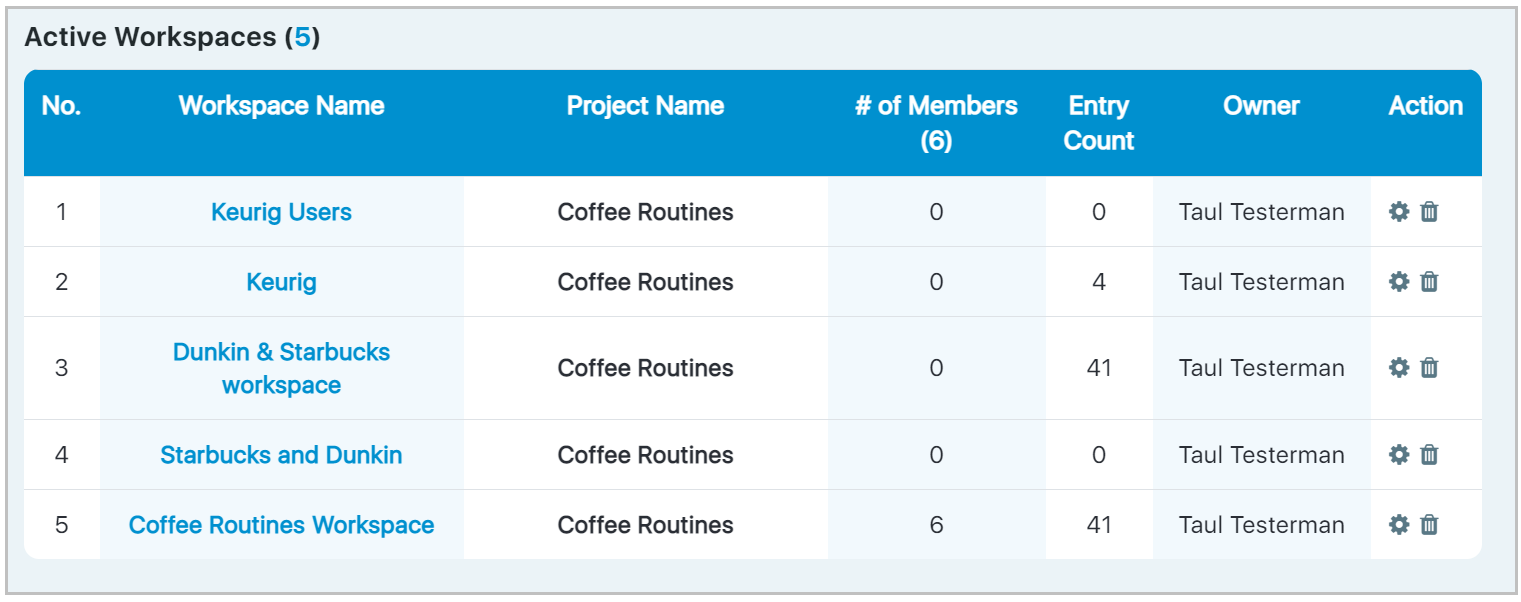
The list of Workspaces page displays the Workspace name, the project it is associated with, the number of members (Reviewers and Managers), the number of entries it contains, and the Workspace owner. Under the Action column you have the ability to delete a Workspace by clicking the trash can icon and you can access the Workspace settings through the gear icon.
Workspace Default View
When you enter a Workspace, you will see the Workspace Default View. This view is made up of all the entries that match the filtering criteria you selected when setting up the Workspace. The top left of the view displays the Workspace name, and to the right of the name, you will find the number of results (entries) associated with it.
Workspace Entries: Workspace entries operate the same way as project entries, with one major difference.
Any updates to likes, notes, star ratings, and codes will be reflected in the project. Example 1: If you add a note to an entry in a workspace it will be visible in the project. Example 2: If you change a star rating from 4 to 1 within a workspace it will be changed from 4 to 1 within the project as well.
Workspace Admin: This dropdown contains 3 options.
- User Management: You can add and remove users on this page.
- Managers: The Manager role is generally for colleagues and clients. This gives them access to the backend, where they can view entries.
- Export Data: Allows you to export Workspace Data. Just select the types of files you would like to export and click the ‘Send export request’ button. The length of time it takes to export the data depends on the number and type of entries your Workspace contains. Once your export file is ready you will receive an email that contains a link to download the files you requested.
- Workspace Settings: Allows you to update the Workspace name and description.