WHAT’S ON THIS PAGE (click a blue link to be taken to that section):
Establish the Target Audience using pre-existing data profiles
Review the details of your project
Inviting/Messaging/Disqualifying/and Paying Participants
Discover the power of EthOS Recruit on the Participant & User Management page. In collaboration with our partner, we offer access to a vibrant community of over 3 million eager participants for your research endeavors. EthOS Recruit is a premium feature that enhances single-project licenses and annual subscriptions. Additionally, it’s available as a flexible pay-as-you-go service, providing the perfect blend of convenience and scalability for your project’s needs. Contact sales@ethosapp.com for more information before using this service.

After clicking Recruit, click the + SETUP RECRUIT button to begin.
Please note: Recruits can include a maximum of 40 screening questions. If you exceed this limit, you won’t be able to proceed to the next page until the total is reduced to 40 or fewer.
Project Title: Assign a name to your project. For consistency and ease of reference, we advise matching the name with that of your EthOS Project.
Example Title for a Diary or Mobile Ethnography: Enter your project’s title, such as “USA Smartphone Diary Study – June 7th-June 14th, 2024,” in the designated field. While this naming convention is not mandatory, it is recommended for clarity. Keep in mind that this title will be visible to potential participants during the qualification process.
Project Description: Deliver a concise yet informative description of your study and how the research will be carried out. While participants appreciate specific details, typically, you will want to refrain from including recruitment criteria here.
Example wording for a Diary or Mobile Ethnography project:
You will engage daily through our smartphone app, diving into various interactive tasks, such as videos.
Project Start: June 7th
Duration: 10 days, approximately 2 hours of work.
Please begin your tasks by the end of the day on June 8th. We will have to replace people who do not start by then.
Research Methodology: You may choose from five options.
- Diary or Mobile Ethnography
- Mobile Device Usability Test
- Laptop/Desktop Usability Test
- Video Survey
- Mixed Method
Your choice should align with the project type initially established in your EthOS project.
Target Market: Choose between B2C and B2B. A verified work email address is a requirement for those who join the B2B panel. For example, an Amazon employee wishing to participate in the B2B panel must authenticate their Amazon-issued email address. This ensures a seamless and professional integration into our B2B network.
Research Topic: This field only shows if you are doing a B2C project. Categorizing your projects will facilitate a more effective matching process, enabling you to connect with participants who have explicitly expressed interest in the specific topics associated with your project. You may select up to two topics.
Target number of participants: Specify the participants required for your project’s completion. For example, if you request 15 participants, we aim to provide you 30 participants, allowing you to choose the 15 you want. It’s worth noting that typically, there’s a 33% no-show rate among invited participants for Diary or Mobile Ethnography studies. Therefore, you might consider inviting 20 participants to account for this possibility. Remember, you’ll only be invoiced for participants who complete the project. However, if you invite 20 participants into your project, and all of them complete it, you will be billed for all 20.
Time commitment for participants (please put a number based on minutes. E.g., 120): Please provide participants with an accurate estimate of the time required to complete your tasks. For instance, if you anticipate the tasks will take 2 hours, you should enter ‘120’ minutes in the designated field.
Participant Incentive: Set the compensation for participants, who will receive their payment via PayPal. Typically, we recommend a reward of $50 for an hour’s work. For tasks spanning two hours, a reward of $75 is advisable. Be aware that payment processing incurs a handling fee. The suggested compensation amounts are tailored for projects lasting 3 to 7 days, so if your project is 10 days and two hours of work we would suggest a $100 reward. Feel free to reach out to support@ethosapp.com if you have a question on how much you should pay a participant.
Registration Deadline: When you invite participants who match your criteria, they will receive an email with an acceptance notice and a registration link. Upon filling out this form, they will automatically be added to your project and emailed the information to access it. The registration link expires on the date you set in this field. The expiration date is based on the time zone of the moderator who set up this project, not the participants. For instance, let’s say you invite 10 participants into your project on June 6th and put a Registration Deadline of June 8th, and lets assume your on the East Coast. On June 9th at 00:00 (Midnight) EST anyone who has not signed up of the ten will be unable to join your project. You can extend this date after the project launches if your timeline changes. Please note that it is advisable to start recruiting participants at least three days before your project launch. If you are targeting a niche audience, consider extending the recruitment period.
Establish the Target Audience using pre-existing data profiles – B2C
In our B2C project, the essential field on this page is the country selection for your project. Additionally, you have the option to further refine your target audience by selecting specific demographics from the drop down menus. If you decide not to choose an option from a drop down, we will consider all participants who meet any of the criteria in that drop down. For example, if you omit selecting a gender, we will match you with participants of all genders.
Establish the Target Audience using pre-existing data profiles – B2B
The B2B project framework is designed to capture comprehensive details for a tailored experience. It is essential to complete the Industries, Job Titles, and Company Size fields, as they are mandatory. Given the extensive range of options for Job Titles and Skills, it is impractical to list them all due to their sheer volume. To find a specific job title, simply begin typing its name, and suggestions will appear. Alternatively, you can access the complete list of job titles by clicking on the “View Job Title List” link, which will direct you to a Google document containing all the available options.
The Job Title list is here: https://docs.google.com/spreadsheets/d/1dLVcPDrvGyKKzHMoxje1y9wGh-XDvrvrPwgTvxgqP0I/edit#gid=0
The Skills list is here: https://docs.google.com/spreadsheets/d/1dLVcPDrvGyKKzHMoxje1y9wGh-XDvrvrPwgTvxgqP0I/edit#gid=1528575643
On this page, you will build out your screening criteria. To launch your project, you must have at least 2 screening questions. You can choose from a mix of Single-Select, Multi-Select, Multi-line text, Single-line text, Number box, and slider question types. You can add questions by clicking the + Add Question at the bottom of the page and move questions up via the arrow to the right of each question you make. You can also use the trash can to delete any questions.
In this screenshot, we have set up a Single Select question. If the participant selects “Other,” they will be disqualified. All the other answer options will continue to the following question.
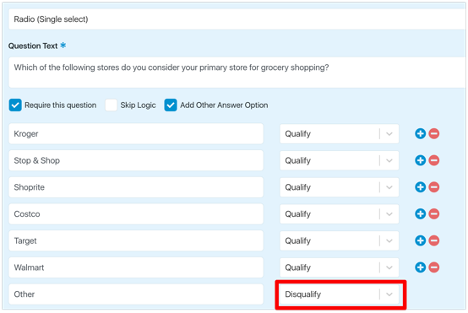
In the below screen shot, I have now added Skip Logic to Q2 (How often do you shop at this store?), where if a participant selects 2 or more times a week, they will go to Q3. If they do not Select 2 or more times a week they will be done with the screener.

Articulation Question
We also recommend that you include an articulation question in your screener. This question should be text-based. Here’s an example we like to use:
Now for something fun. If you were to plan a perfect weekend, where would you go, what would you do, and who would you share it with?
The purpose of the articulation question is to identify participants who provide detailed answers. For example, consider these two responses from separate participants: the second one demonstrates more depth and thoughtfulness.
I would go to Hawaii with my husband.
The perfect weekend would be in an airbnb in the mountains… a fancy place that has all the luxuries for relaxing, but still the necessities for cooking and staying in. It would be just me and my husband. We would go out on the porch and listen to the trees and perhaps a nearby creek, we would read and watch whatever TV we wanted. Food would be easy to access. We would cook together and listen to music. Basically all the things we did before we had kids!
Preview Screener
After setting up your screening survey, be sure to click ‘PREVIEW SCREENER.’ This will guide you through the survey, allowing you to verify that your questions are accurate and the logic functions correctly. Please remember, if you launch a project and later discover issues with the screener, you will need to halt recruitment and rebuild the entire process.
Review the details of your project
Please review your project details carefully on this page. After launching your project, modifications will NOT be possible. For example, should there be a typographical error in your screening survey, or a missing question, you won’t have the opportunity to correct it post-launch. In such cases, you would need to terminate the current recruitment process and initiate a new one within this project.
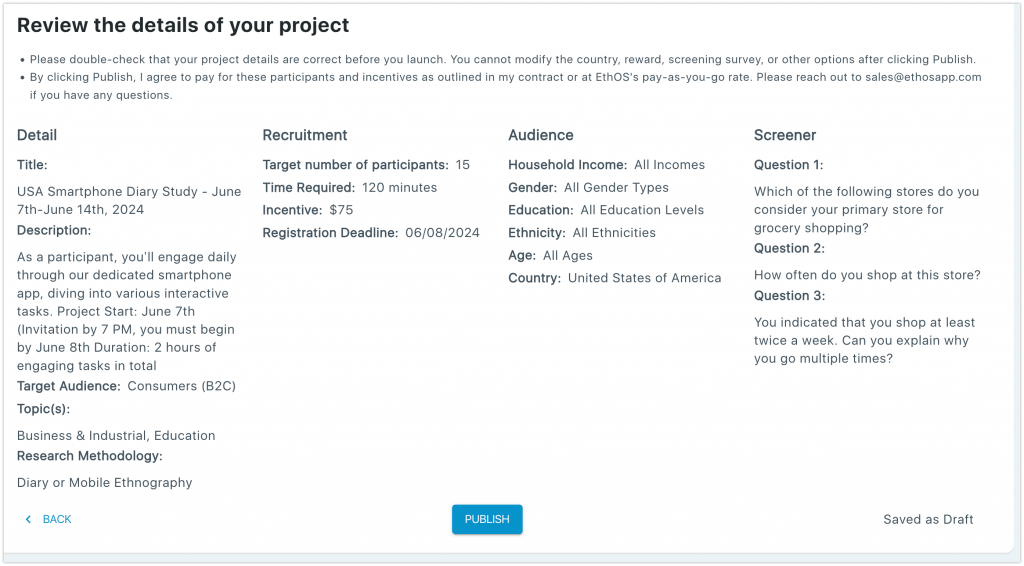
When you’re ready to go live, click the Publish button. If you need more time to fine-tune, choose the Save Draft button instead.
Inviting/Messaging/Disqualifying and Paying Participants
Upon the launch of your project, our team will begin the participant‑matching process within 12 hours—often sooner. After you publish a recruit, please email us at support@ethosapp.com and include the project name. We will then activate your recruitment.
If this email is not sent, your project will not be activated and participant matching will not begin.
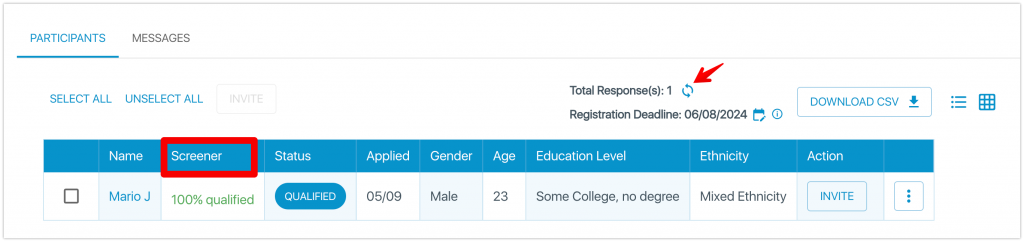
If we confirm that your project is live and you still do not see participants within 12 hours, please let us know and we will investigate. However, please note that for projects targeting a niche audience, the matching time frame may extend accordingly. As participants are successfully matched, you will observe their details populating the ‘Participants’ tab, as illustrated in the accompanying screenshot. To be safe, start recruiting at least a few days before your project launch.
In the participant data columns, the ‘Screener’ column reflects the percentage match of the participant with your screening criteria. For instance, a 100% match indicates a perfect alignment with your requirements. Our goal is to provide you with double the number of participants you request. Therefore, if you seek 15 participants, we aim to deliver up to 30 matches. To update the participant list with the latest recruits, simply click on the circular arrow icon. This action will promptly refresh the page to display the most recent additions (refer to the arrow indicated in the screenshot below).
Once the threshold of 30 participants is reached, the system will halt further matches. Should you require additional participants beyond this number, you can manage this by visiting the ‘Action’ column. Here, click on the three dots to access the ‘Disqualify Participant’ option. This action will disqualify the participant in question, prompting the system to initiate a new match to replace them.
For a deeper insight into participants’ responses, simply click on their name. This will expand a section that not only reveals additional information but also displays their answers to all the screening questions.
Inviting Panelists
To invite participants to your project, simply click the ‘Invite’ link located in the ‘Action’ column. This action triggers a pop-up that presents the participant’s name, the incentive details, and a box for special instructions—accompanied by essential information about the process. While entering special instructions is optional, feel free to add any if you see fit. We ensure that participants receive all the necessary details to sign up and begin tasks within your project, so most users do not use this field.
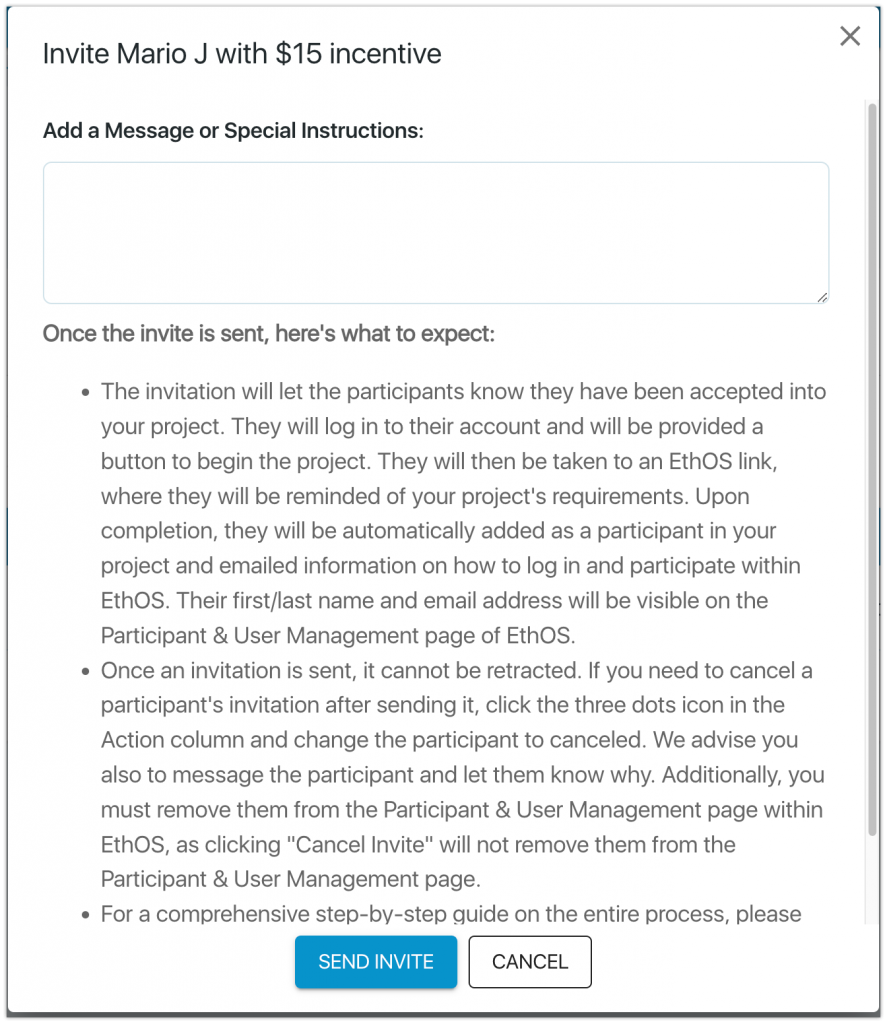
Click the SEND INVITE button to invite Mario J. into your project. Once invited, the Participant list will update the status column will show “INVITED” for the participant.

If you accidentally Invited the wrong participant click the three dots in the action column and click Cancel Invite.
You will now also see two new buttons:
Mark As Attended: If the participant completes your project you will click “Mark As Attended” which will let our partner respondent know to pay the participant. Once completed, their status will change to PAID. When you click ‘Mark As Attended,’ the participant will be paid immediately. Please note, if this action is done in error, it cannot be reversed.
No Show: If the participant doesn’t show up to participate click the No Show button. This will let our partner know not to pay this participant. Once selected, the participant’s status will change to INVALID RESPONSE.
At the top of the participant list you will see a few columns:
Total Responses: The amount of matches for your recruit, which is a combination of 100% matches to your screener survey and ones that are not 100%.
Registration Deadline is the final date for invited participants to enroll in your project. Upon invitation, participants must submit their first and last names, along with their email address, to be automatically included in your EthOS project. Should this deadline pass, new enrollments will no longer be accepted.
You retain the flexibility to adjust this deadline as necessary. However, it’s important to note that a participant’s acceptance of your invitation and subsequent addition to your EthOS project does not guarantee they will actually complete your project. In such instances, you are required to revisit this area and mark the participant as a ‘No Show.’ Additionally, you should remove their details from the ‘Participant & User Management’ section within your EthOS project.
Messages: The ‘Message’ tab serves as a communication bridge with participants. It’s particularly useful for conveying updates, such as project delays, and confirming participants’ availability for a rescheduled start date. In the event a participant is unable to accommodate the new timeline, you can easily withdraw their invitation by navigating to the ‘Actions’ column and selecting ‘Cancel Invite.’
After you begin a recruit and publish or save it as a draft it will be shown on the recruit screen.

View Matched Participants: As participants are successfully matched, you will observe their details on this page.
Edit: This will allow you to edit fields if you have not already gone live. If you have gone live, the majority of fields will not be editable and will be in a read only status.
Pause: This stops us from finding new matches for your project.
Close: Once you’ve marked participants as ‘Paid’ or ‘No Shows,’ you will click this button to close your project. If you setup the wrong specs for your project, and have not invited anyone, you would also use the Close option.
If you have any additional questions please contact your sales representative or contact support@ethosapp.com