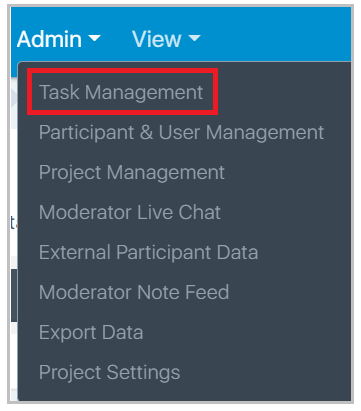
After creating your project, the next step is to add tasks for your participants to complete. It can be accessed within the Admin dropdown in the top navigation.
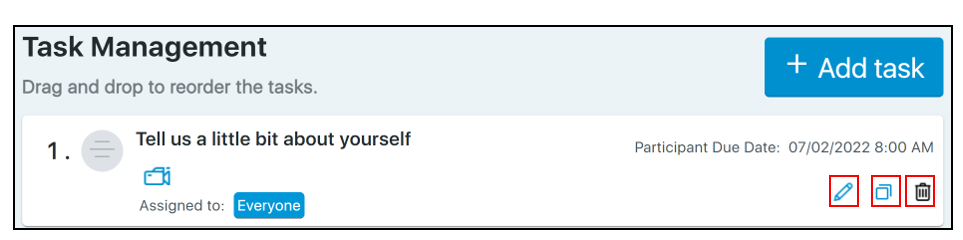
In the screenshot below, the ice breaker task is automatically available since we selected the “Add ice breaker as first task” when creating our project.
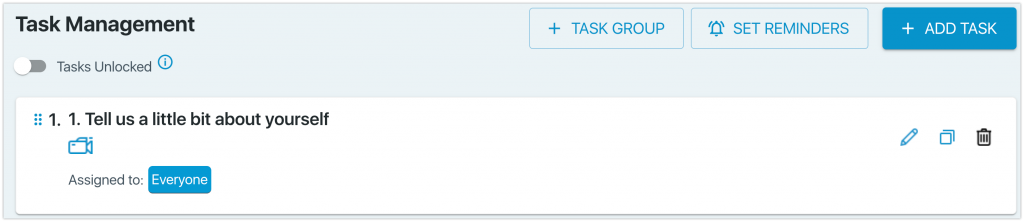
Click the + Add task button on the top right corner of your screen to create new tasks. The available task types are shown in this drop-down:

All Media: This is a task where the participant can take pictures, videos, record audio, or write a text-based entry. This task is typically used when you want to allow your participants to choose the type of media they want to upload.
Picture: This is a task that is picture-based. Participants can take in-the-moment pictures or submit pictures stored on their phones.
Audio: Participants can record and upload an audio file as an entry.
Video: This is a task that is video-based. Participants can take a live video or upload one that is stored on their phones.
Mobile Screen Recording: This is a video-based task, and participants can live record their screens and upload that video. This is typically used when you want a participant to go into your mobile app/view a mobile-based website, and provide in-the-moment feedback as they navigate. Mobile Screen recordings should be limited to 2-3 minutes in total.
Open End Text: This is a task that is text-based. Participants will type out answers on their phones.
Range: This is often referred to as a scale question in survey software. You can decide on the necessary scale range (Ex: 1-7, 1-10, etc.). Please make sure not to put more than ten numbers, as smartphone screens come in different sizes and anything over ten will not look correct on most smartphones. This question type only allows numbers to be inserted for the range options.
Single Choice: This is a single-select question type. Participants select from a list you define and can only choose one answer.
Multiple Choice: This is a multi select question type. Participants select from a list you define and can choose one or more answers.
Matrix Question: A matrix question consists of rows and columns, where the rows represent items or statements, and the columns represent answer options, like levels of agreement, frequency, or satisfaction. Participants can quickly rate or evaluate multiple items within the same framework, making it ideal for comparing responses across similar topics.
The next step is to enter a title for the task. You would type the title in the box shown below:

The Task image or Video allows you to add media to a task to show respondents new product concepts, ads, and more. Participants can click on the media within the app to make it full-sized. The ideal image size is 1280 x 854 (width x height). In most circumstances, you will submit tasks without a picture or media file added.

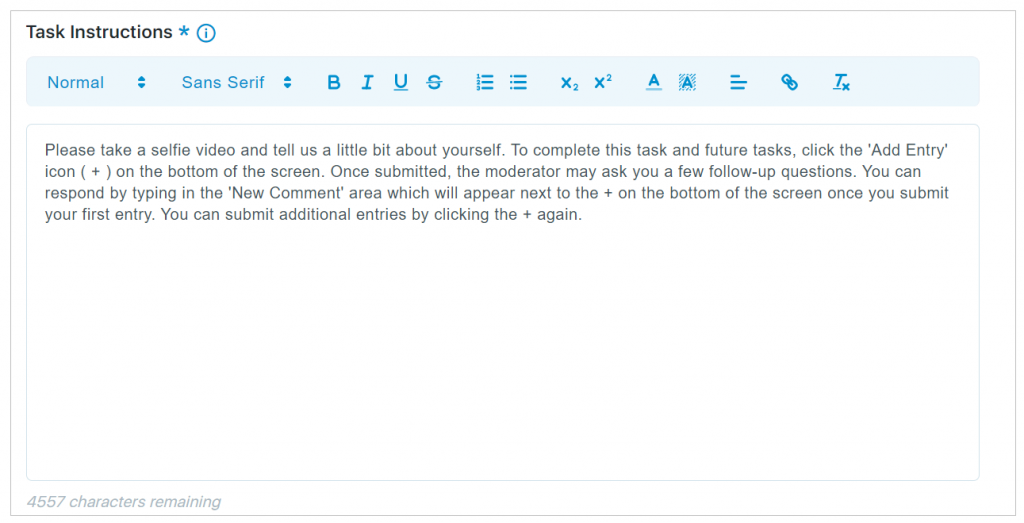
The Task Instructions area is where you will put the instructions for the task that participants need to follow. The Task instructions area can handle 5,000 characters and you will see a counter below it showing how many characters remain. It is a best practice to keep task instructions brief and to be as concise as possible.
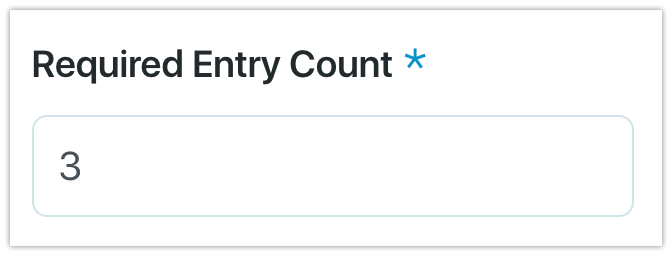
The default setting for the Required Entry Count is set to one. This feature enables the enforcement of multiple entries for a designated task, ensuring comprehensive participation. For instance, in a study examining laundry detergent usage, you might want to document a family’s laundry habits at least three times within a month. To facilitate this, participants would be prompted to log an entry every time they complete a laundry cycle in the same task.
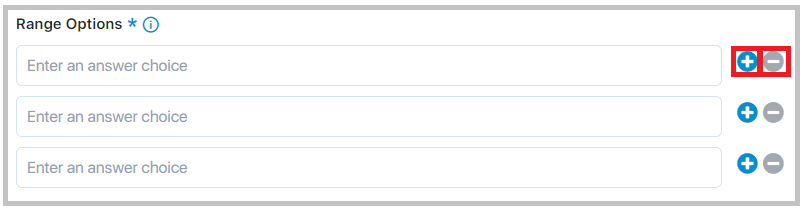
Filling in options for Range/ Single Choice and Multi Choice questions
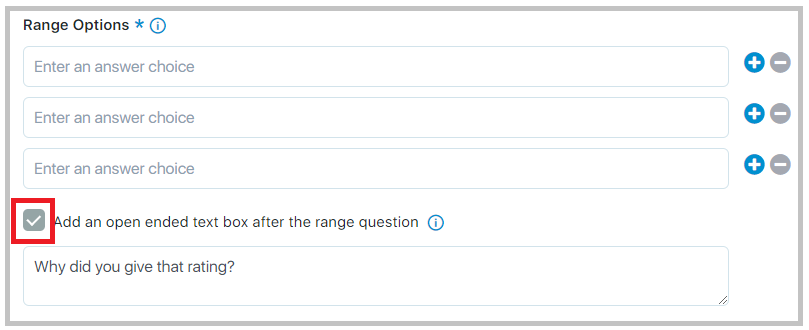
Range options: Please enter a number on separate choice lines. You can add a new line by clicking on the + or remove a line by clicking on -.
Note: If you have a scale of more than 10 values, consider making it into a single select question instead of range.
If you want additional information from the participants on why they chose a particular scale value and to provide more context, you can turn on the “open ended text box” by clicking on the check box. This will be a mandatory field that they must enter to submit the entry. However, if you choose not to select it, the participants won’t be shown a text box after the range question.
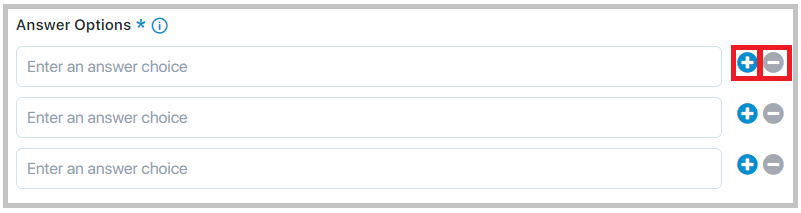
Single Choice Answer Options: Enter the answer list on separate answer choice lines. You can add a new line by clicking on the + or remove a line by clicking on -.
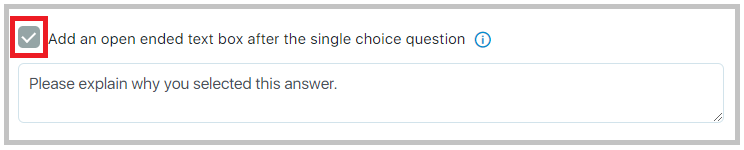
If you want additional information from the participants on why they chose a particular answer choice and to provide more context, you can turn on the “open ended text box” by clicking on the check box. This will be a mandatory field that they must enter to submit the entry. However, if you choose not to select it, the participants won’t be shown a text box after the single select question.
Multiple Choice Answer Options: Enter the answer list on separate answer choice lines. You can add a new line by clicking on the + or remove a line by clicking on -.

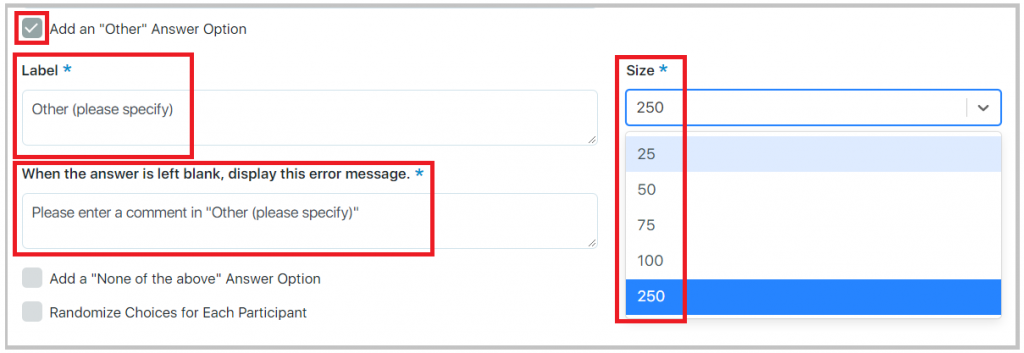
In order to add an ‘other’ option with an ‘other specify’ text box, select the ‘Add an “Other” Answer Option. Add in the label of your choice or the default label will be displayed. For different languages, you can enter the translation for ‘Other specify’ in the label box (you will need to supply the translation). The size of the ‘other specify’ text box can be determined by selecting one of the options from the size dropdown box. By default the size is set to 250 characters. If a participant does not enter any text in the ‘Other specify’ text box, an error message will be displayed. You can enter the error message of your choice in any language in the box provided. Otherwise the default error message will be displayed to the participant.
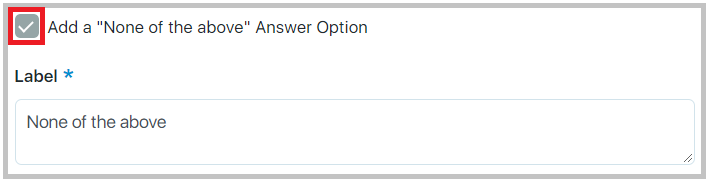
To add a “None of the above” answer option, select that particular option on the page. Once turned on, the participant will have a “None of the above” in the answer list which will work exclusively with the rest of the answer list. You can choose to change “None of the above” to the text of your choice, otherwise the default text will be displayed to the participant.
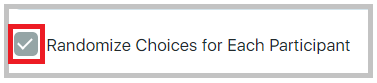
If you want all the participants to see the answer list in a randomized order, turn on the randomization by clicking on ‘Randomize Choices for Each participant’.
Note: When you select randomization, the answer list is randomized but ‘Other specify’ and ‘None of the above’ options (if turned on) always stay at the bottom of the list.
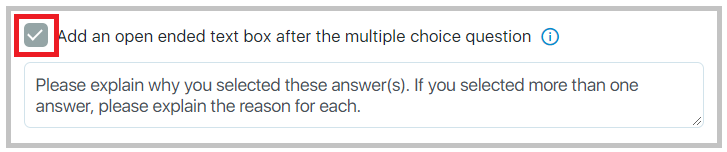
If you want additional information from the participants on why they chose answer choices and to provide more context, you can turn on the “open ended text box” by clicking on the check box. This will be a mandatory field that they must enter to submit the entry. However, if you choose not to select it, the participants won’t be shown a text box after the multi select question. You can change the text by entering the text of your choice or language, otherwise the default text will be displayed.
The Schedule Task field allows you to choose either a specific start date or an interval date to schedule tasks. The first option lets you control the exact date/time it will open for participants.
If you choose the Start Date option, the Date & Time displayed to participants is based on the moderator’s time zone who set up the task. To verify your time zone is set, click your avatar up top, then on the My Accounts tab (at the bottom) is the time zone assigned to your moderator ID. If you do not select a time zone, the system will default the Date & Time to the Eastern Standard time zone.
After scheduling a task, you can choose how to notify the participants. You can send a Push notification at the exact time and date or use other options like email or in-app messages. No notifications will be sent before the scheduled time and date.
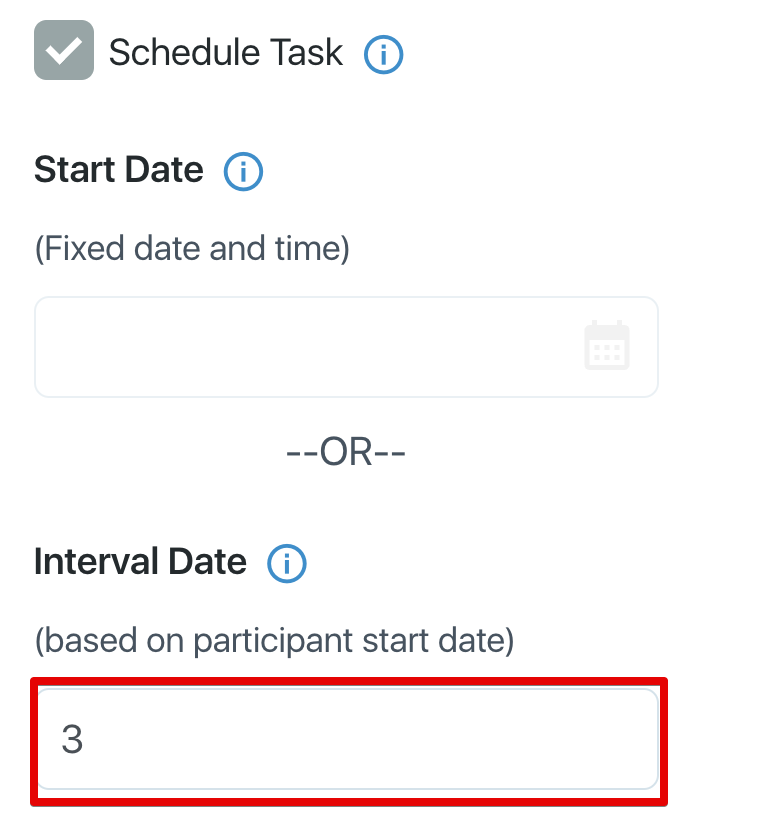
The Interval Date option allows you to specify how many days you want to wait before a task opens for each participant. You need to enter each participant’s start date field when you import a CSV file or add them manually to your project (you will see a column for this date in the sample CSV file). For example, if Dave’s participant start date is January 1 and the interval length is 3 days, the task will open on January 4. If you add Anne on January 5, the same task will open on January 8 for her. Once you invite participants, the Participant Start Date will appear on both the Project Management and Participant & User Management pages. This field is particularly useful for projects where you may invite additional people over a long period of time. This way, as you bring in new people, each task will unlock at the same interval length as past participants. You can also utilize this field on the Project Management page to get a quick read on which participants started one day vs ones that started after them.
In the screenshot below, ‘3’ days were selected for the Interval Date.
Please note: Participant Start date is an optional field. If you leave it blank, it will default to the current date for each participant. If you do not plan to schedule tasks this way, you can ignore this field on manual and CSV uploads; the system will assign today’s date for each participant.
In the screenshot below, you can click the date of each participant if you want to change the participant start date for them.

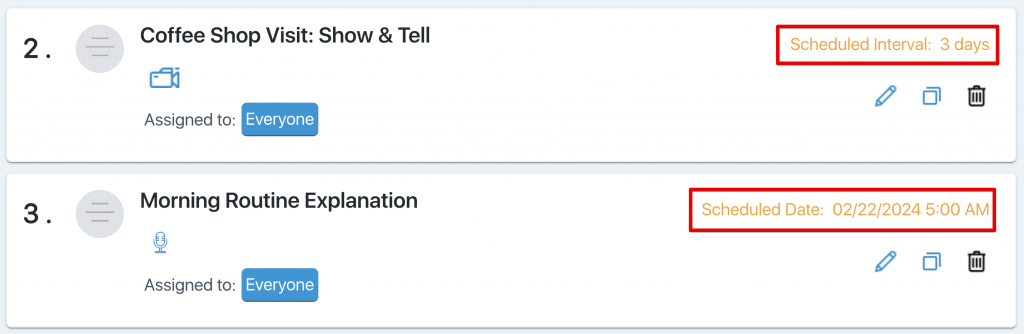
Once you schedule a task, the scheduled time will appear on the Task Management page. The first is an Interval Date scheduled task, and the second is a scheduled task at a specific date and time.
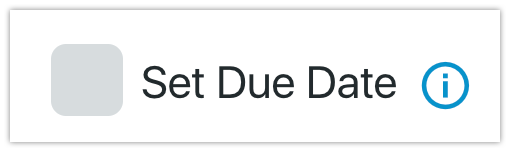
The Set Due Date field, shown below, is optional. It lets you choose a due date for the task, which will appear on the mobile apps. Participants can still complete the task after the due date, as long as your project is active. You can change the due date anytime, even when the project is live. To send automated reminders, you need to set a due date.
If you click on the Due Date button, you get a calendar where you can select a future date/time.

Set Reminders
You can schedule automated reminders for your tasks by clicking the set reminders button at the top of the Task Management page. However, you need to set due dates for your tasks first. The previous section shows you how to do that. After you set a due date, you will see the tasks with due dates on this page, as shown below.
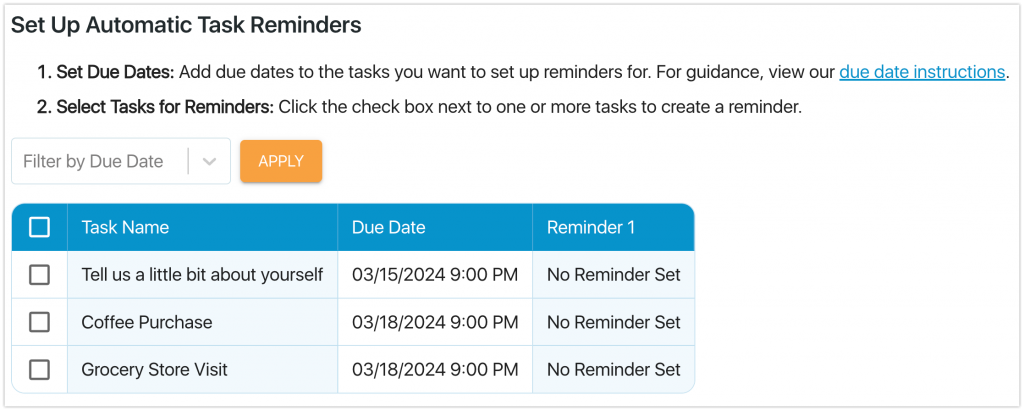
As shown in the screenshot, you can click on the tasks that you want to receive automated reminders for. You can choose any number of tasks for this purpose. We suggest setting a reminder for two days before the due date, and sending only one reminder if you have several tasks due on the same day.
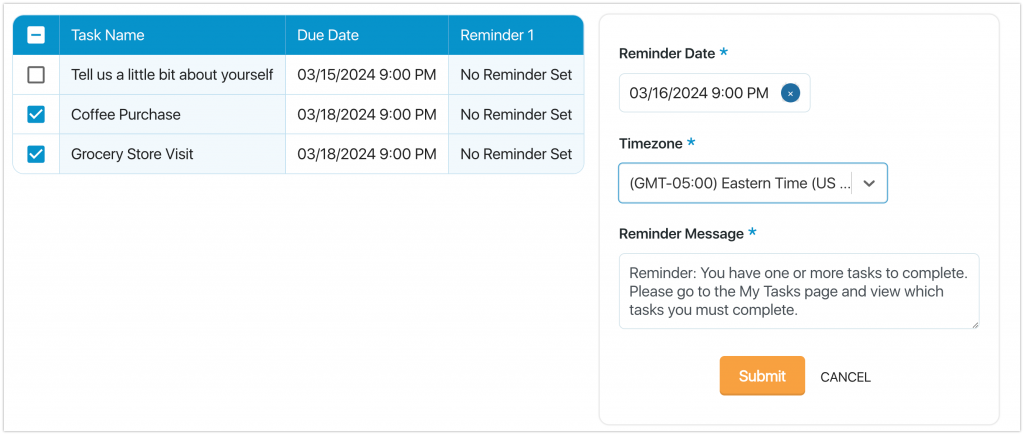
You can see in the screenshot how I selected both the Coffee Purchase and the Grocery Store Visit tasks to set reminders for them. After you check the boxes, more options will appear below. You can choose the Reminder Date, the Timezone for the push notification, and the Reminder Message. You can either use the default message or write your own. In my example, I set the reminder for two days before (what we recommend you use) the due date and picked the Eastern Time Zone for the notification.
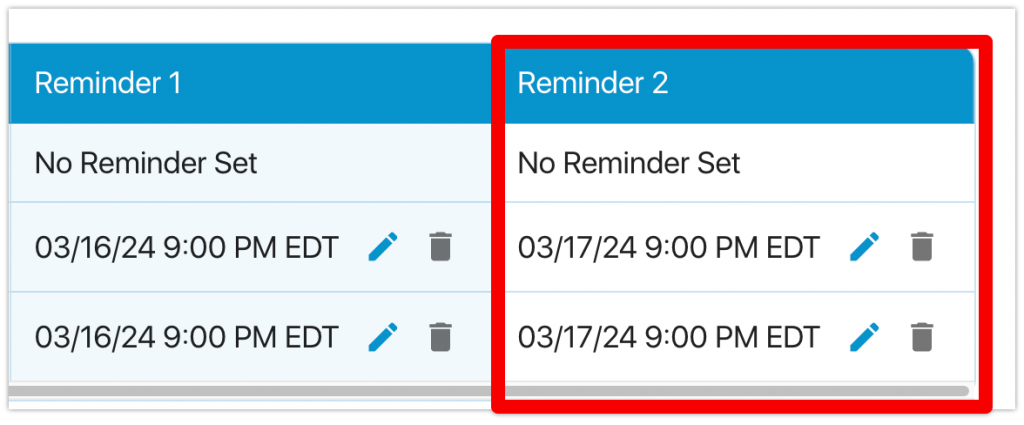
After you set a reminder, you will see the date and time for it in the column. You can edit or delete it by clicking the pencil or trash icons. You can also set a second reminder for the same tasks, which will appear in a new column called Reminder 2, as shown below. The reminder will not trigger if the task is already done. If you have multiple tasks with reminders, it will trigger if at least one of them is not done.
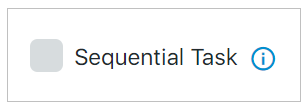
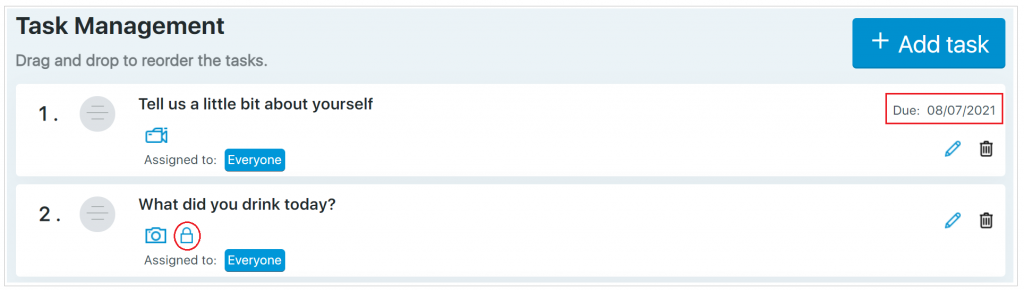
The Sequential Task option can be turned on by putting a check in the box. This feature requires the participant to complete the prior task before being able to enter the next. If you put a check in the task “What did you drink today?” the participant would have to do the task “Tell us a little bit about yourself” before being allowed to submit an entry for the “What did you drink today?” task.
In the below example, we have checked the sequential task option for the task “What did you drink today”. You will notice a icon in the screenshot below. The participant will need to answer the question “Tell us a little bit about yourself” before being able to unlock the “What did you drink today” task.
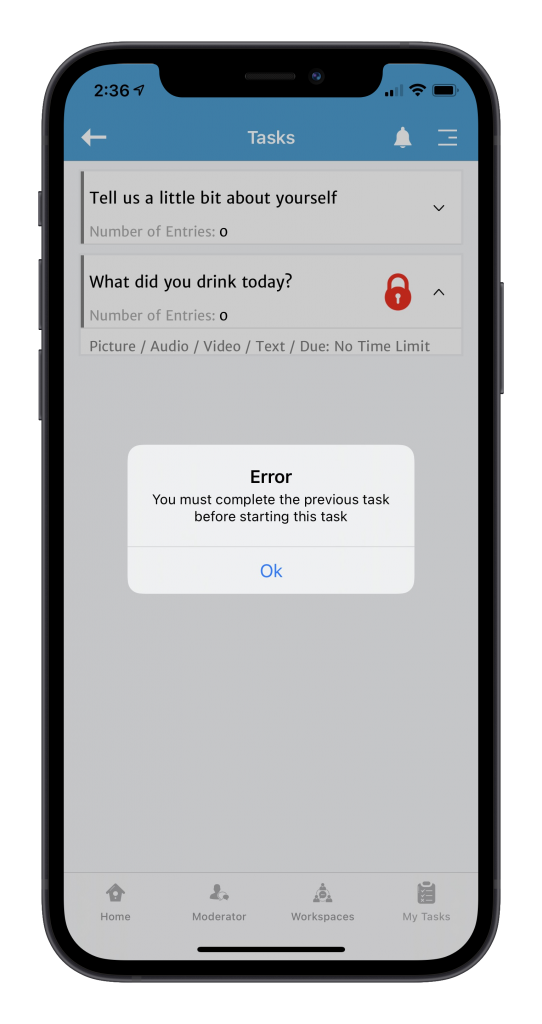
As reference, if a participant tries to go into this task, they will get a pop-up like shown below.
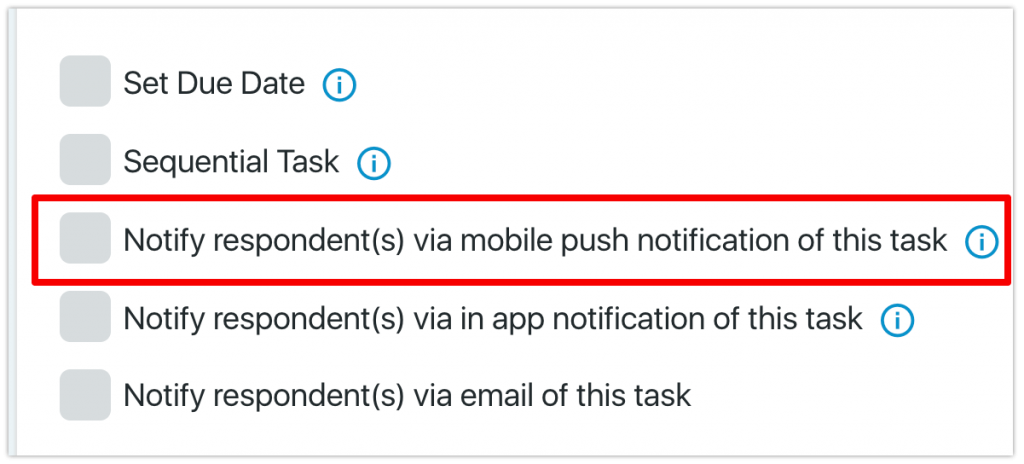
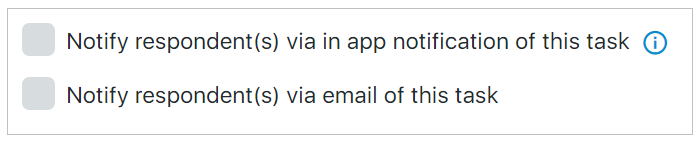
The next two options are for alerting participants about new tasks. Typically, users will not check these boxes, as some participants will think you are spamming them if you choose them on every task you make. It is also a best practice to set up your tasks before inviting participants into the project. When a participant is added to a project they will be notified via email that they can login and start the project, at that point, tasks should have been already created by you, and they will see them in the ios and android apps when they login for the first time. Some moderators will add a few tasks on day 1, and more on day 2, etc. – this is when you may want to alert participants of a new task. However, it is a best practice to only use a notification for one task, even if multiple are added, as the participant will see the additional tasks when they login.
Notify respondent(s) via an in app notification of this task: This will push a message to the EthOS app notification bell (inside the app) to alert the participant a new task is available. If clicked, they will be taken to the task.
Notify respondent(s) via email of this task: This will send an email letting the participant know they have a new task available in the app.
The Assigned to area is:

Everyone: When selected, all participants will be eligible to participate in this task.
Individual: When selected, you can define who gets this task. You can select one or more people.
Segments: Segments allow you to show tasks to certain people in a project. Some moderators upload external participant (segments) data into a project before it begins and assign tasks based on a particular segment. E.g., If you uploaded a gender variable and an income variable, you might assign a task only to Males AND $100,000 income levels. Please remember, if you are going to assign tasks by segments and also use the bulk import CSV, you will need to make the segment name in Admin > External Participant Data and then assign the tasks to this field. You can then bulk upload the data for this External Participant CSV file. In essence, if you plan to assign tasks by segments, you will just name the segments manually on the External Participant Data page. Then you will import in the CSV file that assigns the options to the participants for this data. Please remember that adding Segments to a task is based on ‘and’ statements. For instance, if you select more than one segment for a task, the participant will need to fall into both segments to be shown the task. To manually create segments, go to Admin > External Participant Data, and you can manually add segments to participants.
You also can upload in a CSV with participant data when you start a project. This can be found at Admin > Participant & User Management and then clicking the ‘Bulk Member Import’ button. If you have never made a segment, we advise reading the help center topic on External Participant Data and bulk uploading participant data via a CSV file.
Example:
When you select Segments, they will be shown below if you have some. In this example, we have a ‘Gender’ and an ‘Income’ segment in the project.
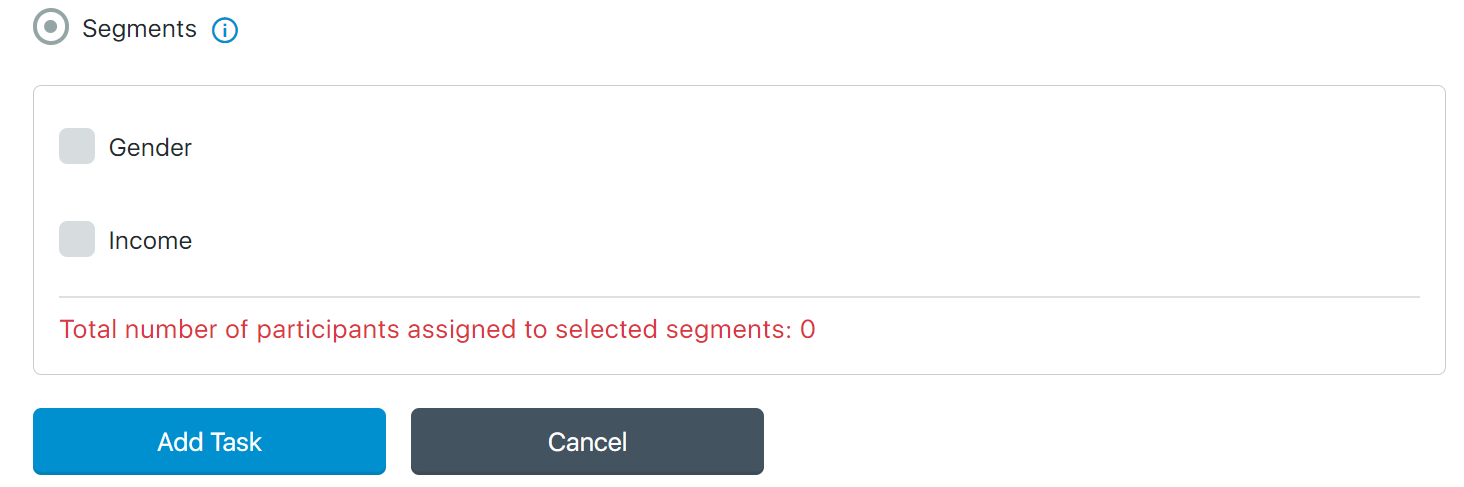
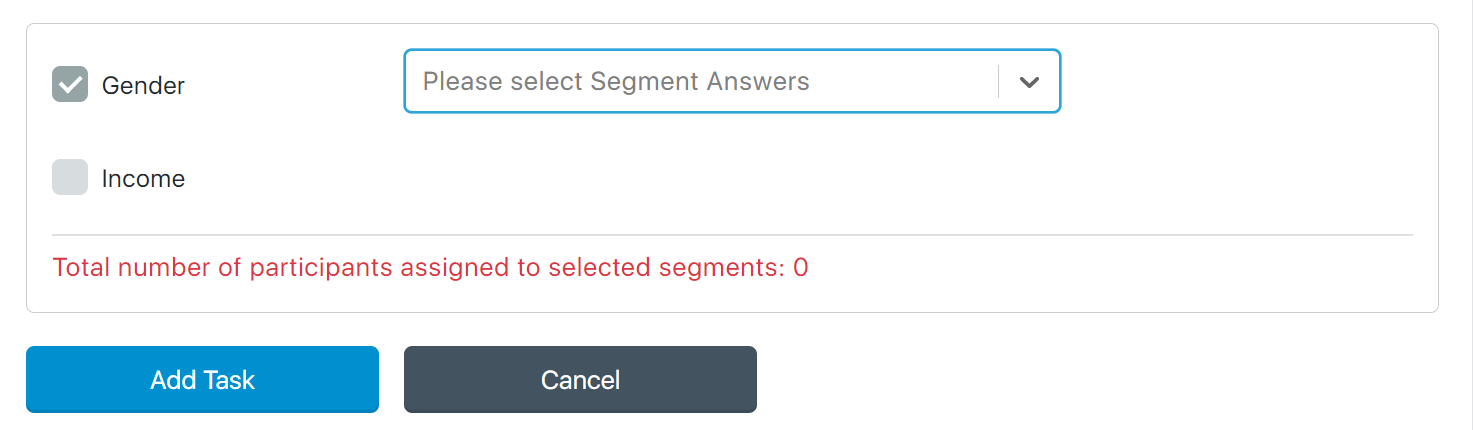
Since we have no selections so far, the red message above says we have 0 people assigned. Once we click Gender, we will get a drop-down to select from.
Once I select an option, in this case ‘Male’ I get the following:
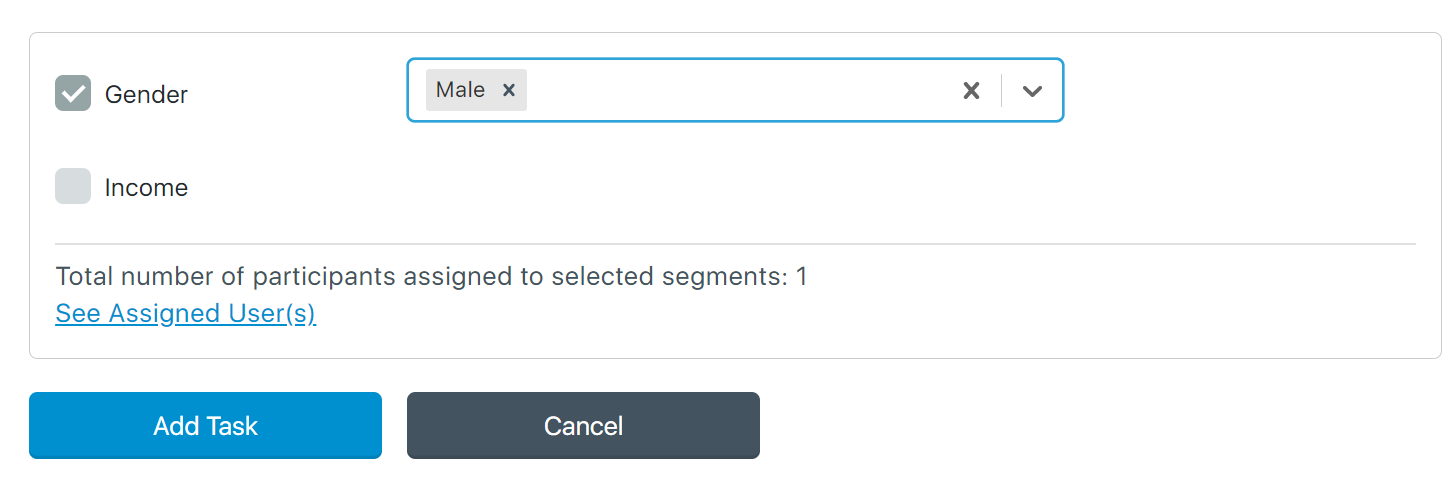
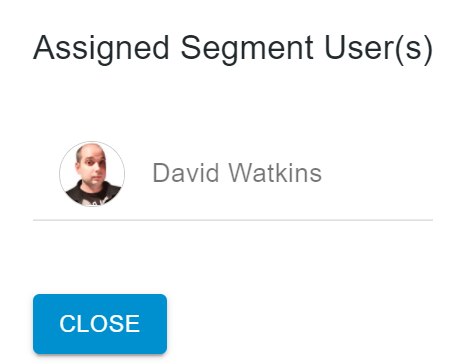
In the above, you will see it has ‘1’ user assigned. If you click ‘See Assigned User(s), you see who is a part of this segment.
If you click Add Task, only David Watkins will be assigned to this task. You will then see it is marked on the task page like the below, where it shows you the name of the Segments in that task and how many people are a part of it.

Suppose you realize you have recently added more people to the project and forgot to assign them the “Male” status. You could go to Admin > External Participant Page and then assign ‘Male’ to other participants. Upon changing the segment area, the task will auto-update. When you go back to the task page, you will see that a second person has been automatically assigned to this task (Participants now say 2).

Please note: If you assign a segment to a task and collect answers on it, you cannot change it to another segment. For instance, if you have Task 1 assigned to a segment “Males” and Dave, the participant answers the question, you can no longer go back into the task and change the segment to a different segment (e.g., Females). You will also be unable to modify an existing segment to an individual or everyone task if you have collected answers for that task.
If you are individually assigning a task to people, once a task that has individuals assigned gets an entry from 1 or more individuals, you will not be able to remove anyone, but you will still be able to add more people in.
After creating tasks, you are able to edit them by going back to the “Task management” page and clicking the icon to the far right. You can also copy a task by clicking
![]() icon. Please remember, if you copy a task and your project is already live, the participant will immediately see that new task in the apps. The copy will also have the prior due date and scheduled push notification, in-app notification, etc., on them, so you will need to edit these if you have put these on for the task you are copying. It is also best practice to always have a new task name for each task, so you will almost always want to edit the name of a copied task. You can delete a task by clicking the
icon. Please remember, if you copy a task and your project is already live, the participant will immediately see that new task in the apps. The copy will also have the prior due date and scheduled push notification, in-app notification, etc., on them, so you will need to edit these if you have put these on for the task you are copying. It is also best practice to always have a new task name for each task, so you will almost always want to edit the name of a copied task. You can delete a task by clicking the icon. It is a best practice not to change tasks after a participant has submitted an entry, as it could result in biased data, and or cause issues with how you are filtering your dashboard results.
After you have created all your tasks, we recommend you click the toggle button at the top of the Task Management page and turn it on. Once on, it will say: Tasks Locked and look like the below:

When the toggle is on, you will not be able to edit, copy, or delete tasks, and your coworkers, who are managers in the project, will not be able to either. You will also be unable to drag and drop the tasks into a different order. However, you will still be able to create new tasks. It is recommended that you lock the tasks after you have made them. That way, you will not have any situations where the order of a task is changed, a task is accidentally copied, etc. If a project is live and a task is moved, copied, or deleted, it will automatically reflect that change to the participant. That is why it is best to use this feature. If you need to make a change, you or another moderator in your project can click the toggle button again to turn it off. You will then be able to edit, delete, copy, or rearrange the order of the tasks.
Task Group
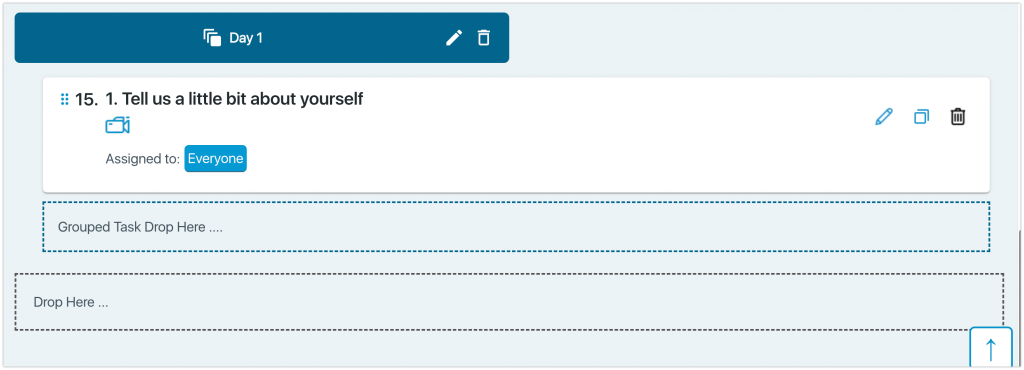
This feature allows you to assign grouping names before tasks. For example, if you’re conducting a 2-day diary study and want specific tasks completed on certain days, you can add a grouping name before each set of tasks. When you click the Task Group button, a dialog box will appear. Here, you can enter the name of your task group.

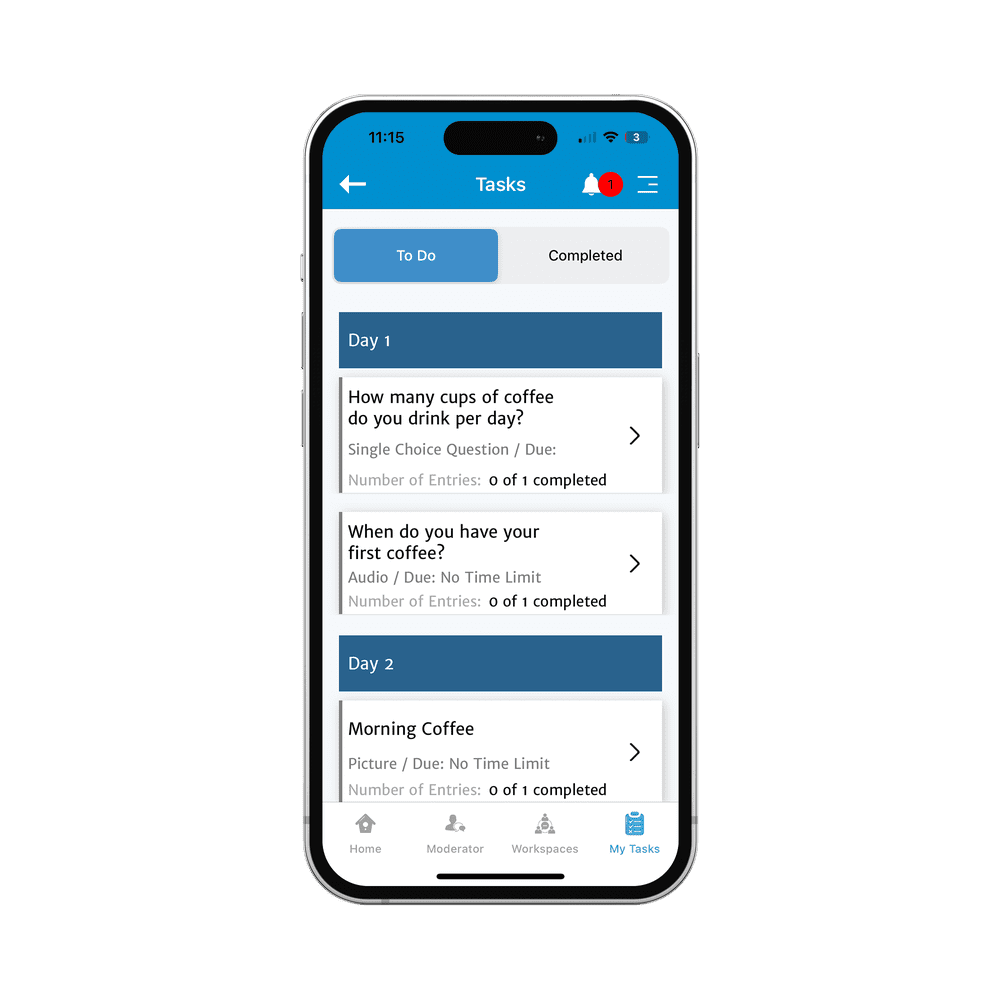
For example, let’s use “Day 1.” After submitting, you’ll see a blue label at the bottom of the page.
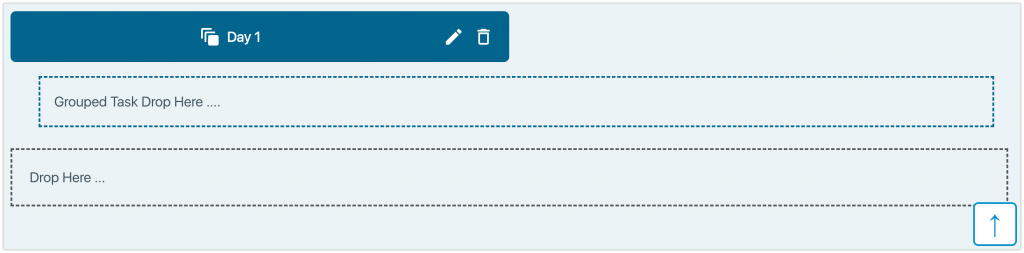
Now, you can create your tasks and simply drag them under this label.
In the screenshot below, participants will see that we are conducting a 2-day diary study, with tasks organized under Day 1 and Day 2. As participants complete the tasks for the day, both the tasks and the grouping label will automatically move to the Completed tab.