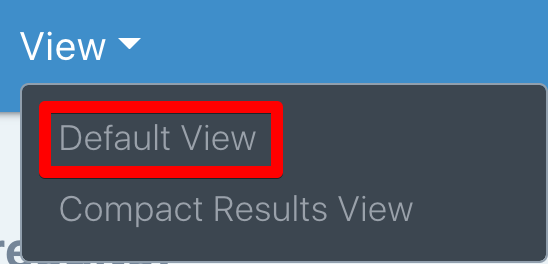
Default Dashboard View
When you enter a project, you will see the default dashboard view. It can also be accessed through the View dropdown in the top navigation.
The project name is located on the top left of the default dashboard view page. To the right of the project name in parentheses is the number of entries that have been submitted to the project so far. When you run a filter, the number of results may change as it will update to match the number of entries that fit your filtering criteria.

The default dashboard view contains all of the entries submitted to the project sorted from new to old (The newest entry can be found in the top left, while the oldest entry is in the bottom right). Each card represents an individual entry submitted by a participant. Participants can submit multiple entries to a single task.
Individual Entry – Collapsed View
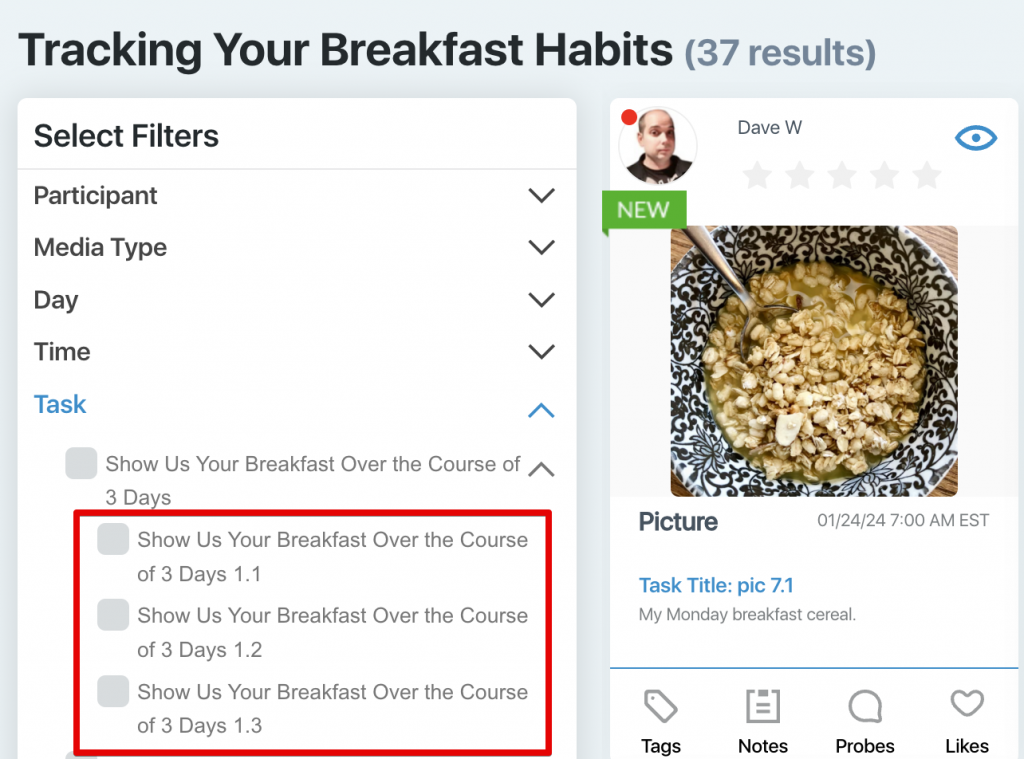
The project below tracks a participant’s breakfast habits over three days. Participants can submit their breakfast logs for all three days in the same task, and the moderator can see a breakdown of each submission using the task filter (This filter is also available on the Compact Results & Participant Journey Report). In the screenshot below, the red area filters each entry submitted by each participant. For instance, 1.1 represents the first submission to this task by each participant, 1.2 represents the second submission, and so on. To view every entry for all three days, click the checkbox above the red area in the screenshot below. Please note: No setup is required by the moderator for this new functionality to work, and if a participant uploads additional entries, they will be added as 1.4, 1.5, etc.
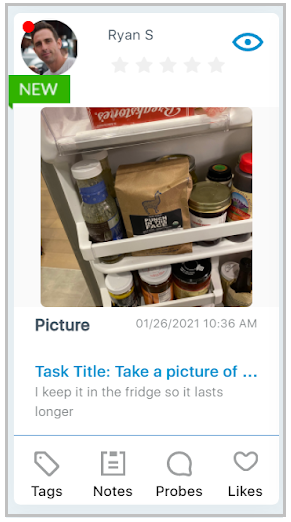
Online Status: There is an online status indicator in the top left of each entry card by the participant’s profile picture. The indicator will turn red when the participant is not within the app, and it will turn green when the participant is within the app.
Profile Picture: The participant has the ability to add a profile picture within the app.
Participant Name: The participants’ names can be found at the top of the card next to the right of their profile picture in the format first name, last initial.
Viewed Icon: The view or eye icon is located in the top right of the card. When clicked, it will turn the top of the card blue to indicate you have already viewed this entry. This is helpful as it lets you know which entries you have already analyzed.
Star Rating: Moderators have the ability to give each entry a 1-5 star rating. The star rating field is shared amongst moderators. E.g. If one moderator gives an entry 5 stars, other moderators in the project will see it as 5 stars. If another moderator changes it, it will be changed on all moderator accounts.
Entry Media: Picture, video, and audio entries will be displayed in the middle of the entry card. Video and audio entries can be played while in the collapsed view.
Single Choice and Range Task Entries: The participants’ single choice and range responses will be displayed in the middle of the entry card.
Open Text Entries: The open text entries are displayed in the middle of the entry card. Only a portion of the response may be visible if it is a longer entry, but you can expand the entry to view the entirety of the text.
Task Type: The task type is indicated on each entry. For pictures, video, and audio entries, the task type is listed below the media. For open text, single choice, and range tasks, the task type is listed above the response.
Submission Time: Each task displays the time, date, and time zone the participant submitted the entry.
Task Title: Each task provides a preview of the task title associated with that entry.
Task Description: Each task provides a preview of the task description submitted by the participant. After completing each task, participants are prompted to enter a description that provides more context and details to their entry. Only a portion of the description may be visible in the collapsed view, but you can view the entire description by expanding the entry and navigating to the description tab.
Tags: The tags icon will turn blue when tags are present within the entry. You can hover over the tags icon to see how many tags have been submitted. If you click the tags icon, you will be brought into the info tab within the expanded view of the entry. Tags can be found at the bottom of this tab.
Notes: The notes icon will turn blue when a moderator leaves a note within the entry. You can hover over the notes icon to see how many notes have been left by moderators. If you click the notes icon, you will be brought into the expanded view of the entry where notes are displayed.
Probes: The probes icon will turn blue when probes are present within the entry. Probes are follow-up questions the moderator asks to participants along with their responses. You can hover over the probes icon to see how many probe responses you have received from participants. If you click on the probes icon, you will be brought into the expanded view of the entry, where you can view the associated probes.
Likes: The likes icon will turn blue when a moderator likes an entry. Multiple moderators can like the same entry, and when you hover over the likes icon, it will show you how many likes that entry has. You can click the heart icon to like an entry.
Individual Entry – Expanded View
You can click anywhere within a closed entry to expand it and see its underlying details. If you want to change your settings for expanded entries, you do so by clicking your avatar in the top right and then clicking the “Project Settings” tab. By changing these settings, you can have all areas of an expanded collapsed by default or only specific areas. In the screenshot below, this user only has only the Description area collapsed by default.
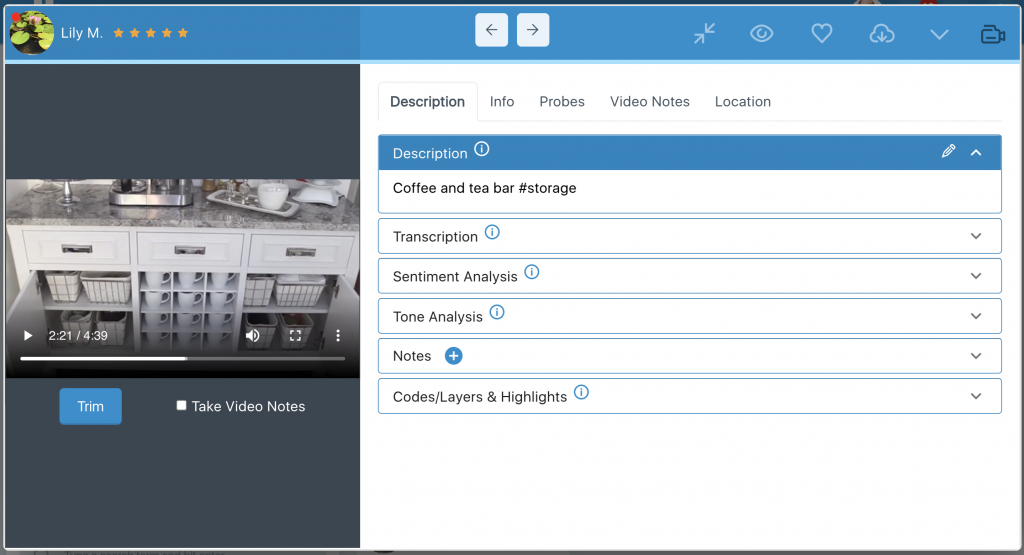
When you expand an entry, the media or response submitted by the participant will be on the left. Media can be expanded further by clicking the icon in the bottom right. Videos can be trimmed by clicking the Trim button. Move the left and right ends of the slider to set the beginning and end of the video clip you want to take. You can then download the trimmed video by clicking the download button.
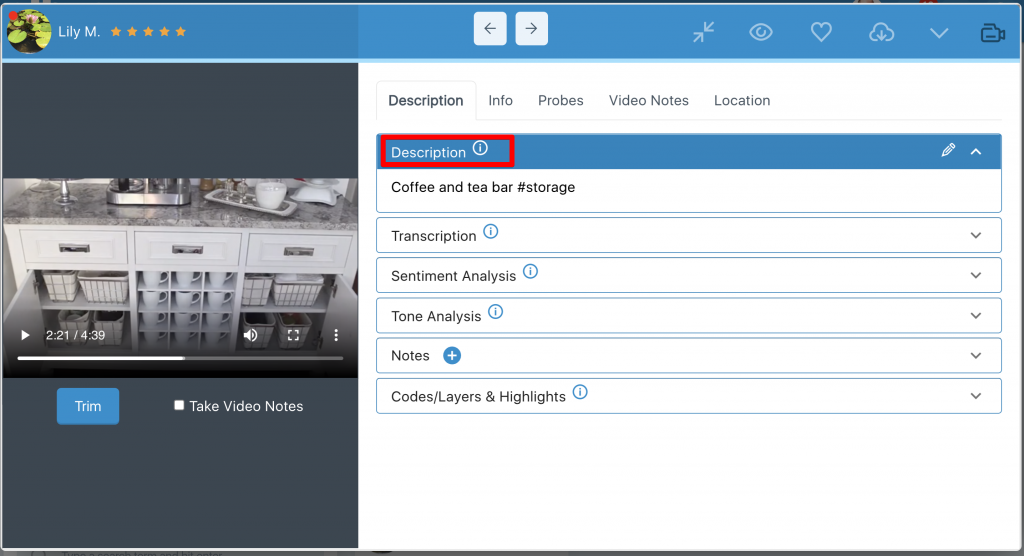
To the right of the media or response are several different tabs. The Description tab has several different pieces of information about the entry.
Description Tab: Participants are prompted to leave a description with their entry that provides more context and details surrounding their submission. The description is used to run sentiment and tone analysis for picture, open end, single select, and range questions.
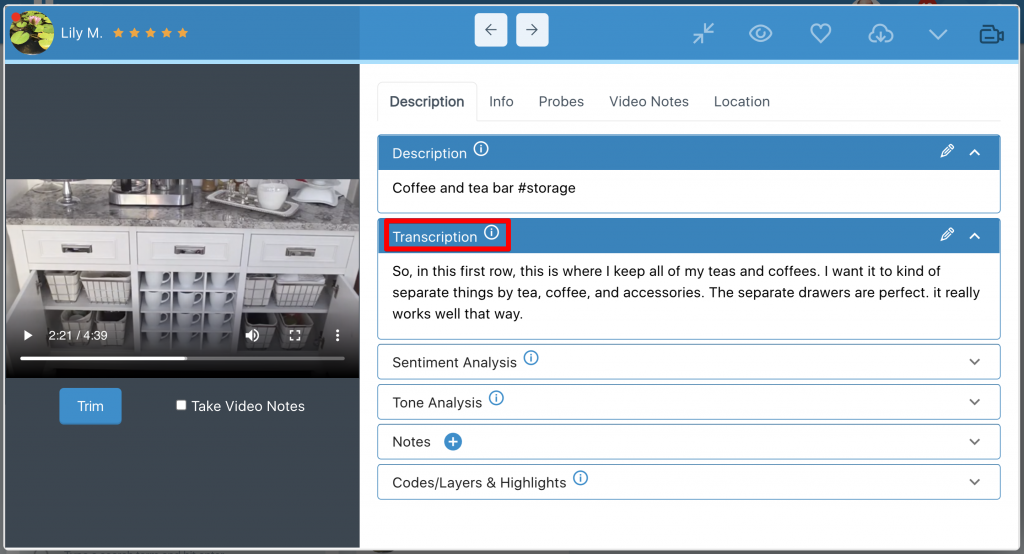
Transcription: Video and Audio entries will automatically be transcribed. You can edit transcriptions by clicking the pencil icon. Once a transcription is edited and saved, the Sentiment and Tone analysis will run again. You will need to refresh the page on your browser to see the change.
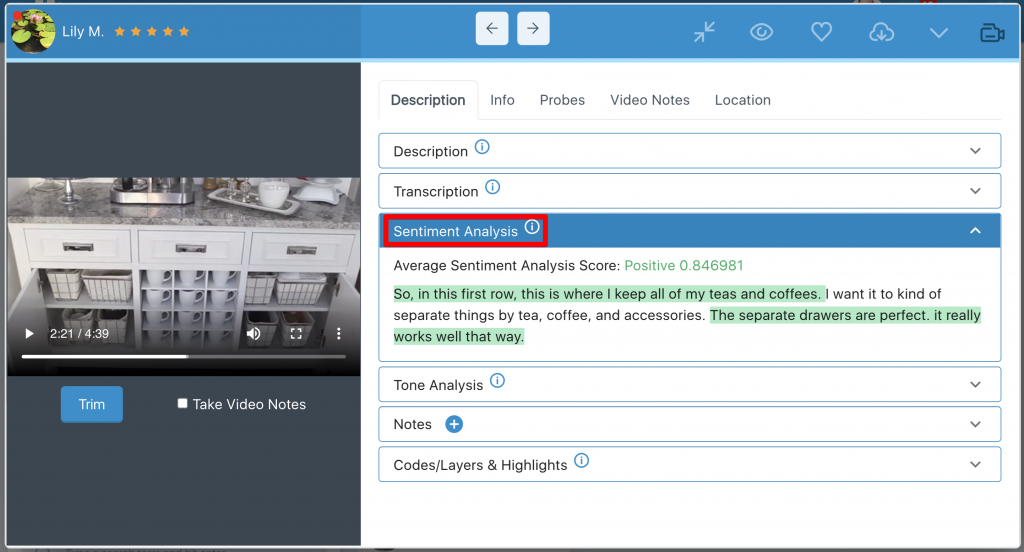
Sentiment Analysis: Sentiment analysis is either run on the transcription of video and audio entries, or on the description left by participants on other entry types. Sentiment scores fall on a range of -1 to 1 with -1 being the most negative, 0 being neutral, and 1 being the most positive. Neutral entries will have a score of 0, negative entries will have a score from 0 to -1, and positive entries will have a score from 0 to 1. You can hover over individual sentences to see the sentiment score for that sentence. If you edit the transcription or description and refresh the page it will recalculate the sentiment score.
*Sentiment Analysis is currently available in the following project languages: English (United States), French (France), German (Germany), Spanish (United States)
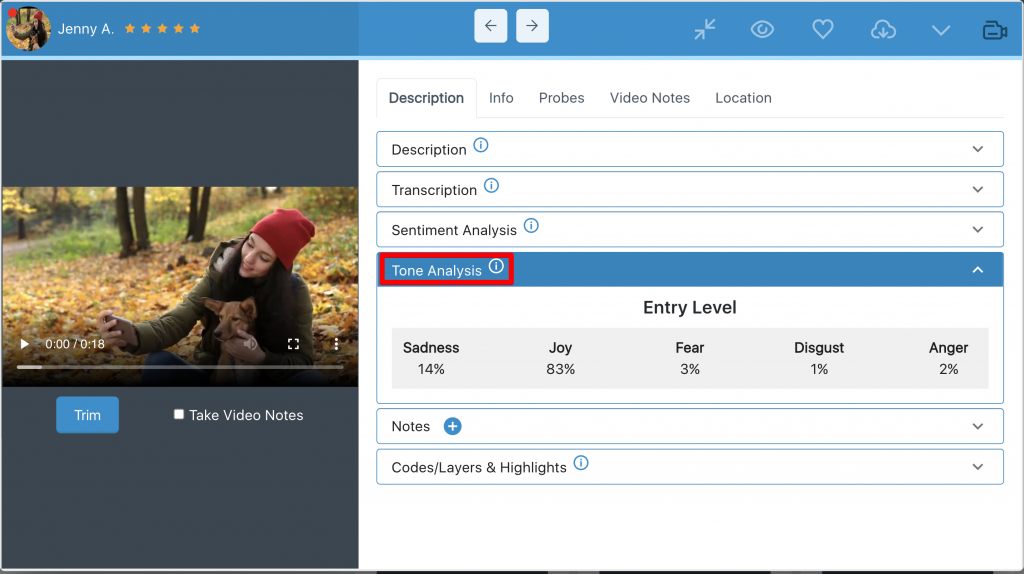
Tone Analysis: The tone analysis engine detects anger, disgust, fear, joy, or sadness conveyed at the entry-level. Tone analysis is run on the transcription of video/mobile screen recordings and audio entries. For picture tasks, it is run on the description. On open-end text tasks, it is run on the text, and on single-choice, multiple-choice, and range questions, it is run on the open-end follow-up question (if you include one).
*Tone Analysis is currently available in the following project languages: English and in French.
Notes: Moderators can leave notes for themselves and other moderators in the notes area. Notes are viewable by any moderator that opens the dropdown. You can see a list of notes added across all entries in the Moderator Note Feed within the Admin dropdown.
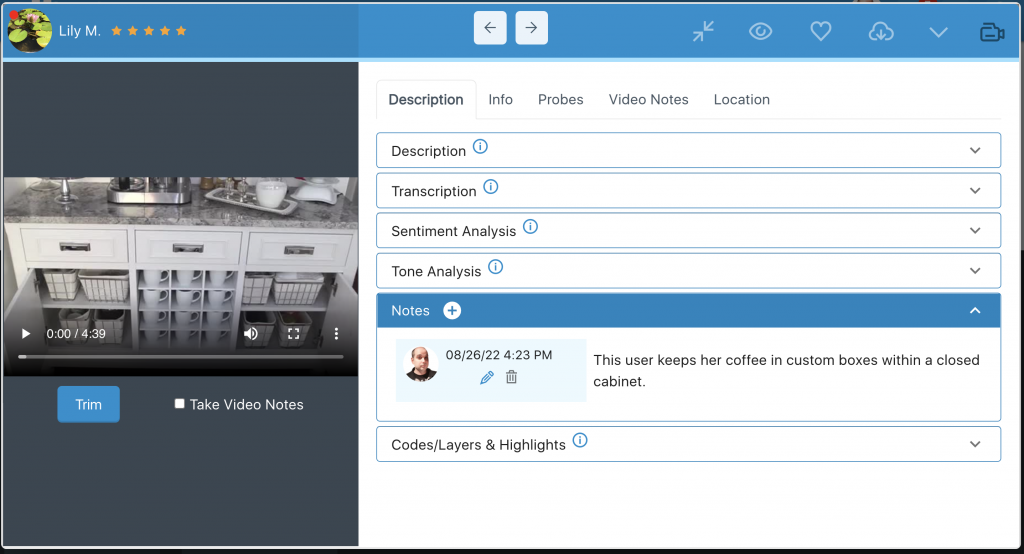
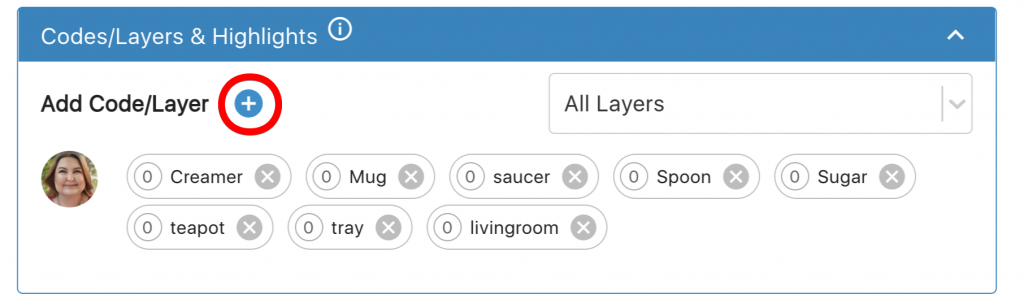
Codes/Layers & Highlights: Codes allow moderators to mark entries for sorting and analysis purposes. Layers are groups of codes. In the platform, you have a few ways of coding. The first way is to click the circular + sign in the Codes/Layers & Highlights section.
When you click, you will get a popup like shown below. The example popup has many different layers and codes already made for this project. The layers we have are Default, Accessories, Brands, Inside, and Outside. If this is the first time you are coding in your project, you will only have the “Default” layer. If you ever want to add or remove a layer, you can click the “MANAGE LAYERS” icon.
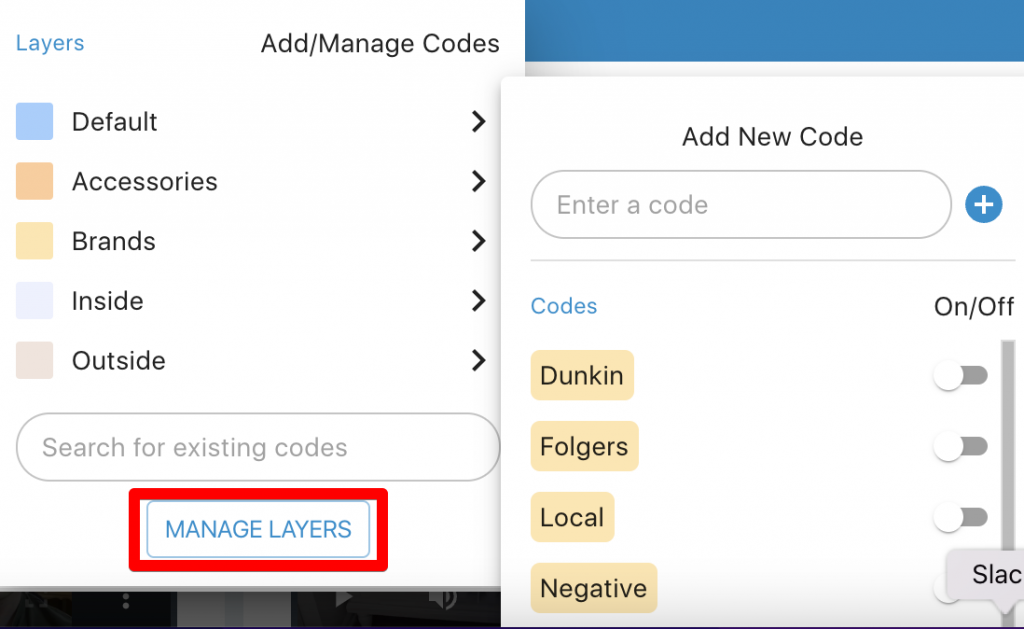
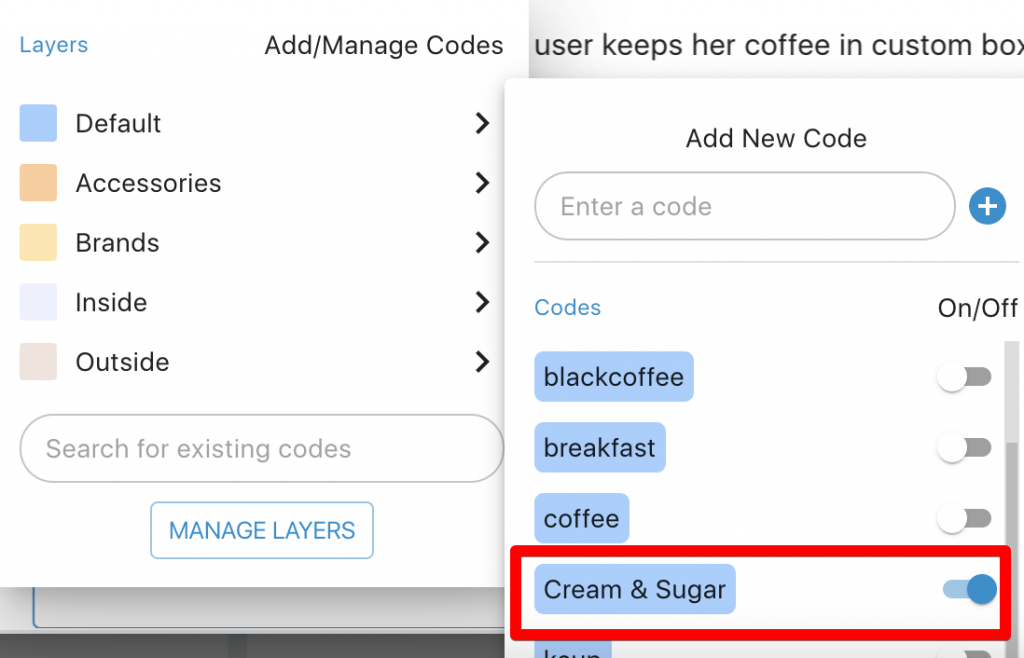
If you want to add a code to a layer, you would simply click > to the right of the layer you want to add a code to. For this example, we are adding a code to the Default Layer. You would add the code in the Enter a code box in the second popup. In the example below, I have typed in “Cream & Sugar.” You would hit Enter on your keyboard to submit this as a code or click the blue + icon.

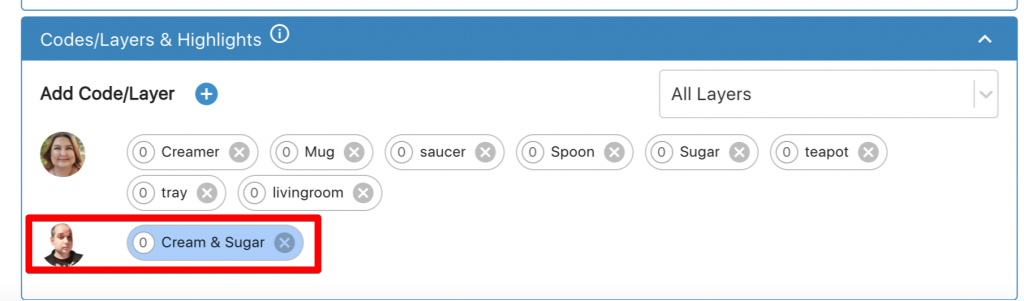
Once submitted, you will see it in the list for that layer. When the radio button is blue (like in the picture below), the code has been applied to this entry. You can toggle codes on and off by clicking the radio button with your mouse.
If you exit the popup, you will see all the codes applied so far. All codes that are used via this method will always have a “0” before the words. So in the case of the code we just created, it says 0 Cream & Sugar. You will see that a second moderator was the one who added the “Cream & Sugar” code in the picture below. If you decide you don’t want this code, you can click the circular X button to the right of the word to remove it.
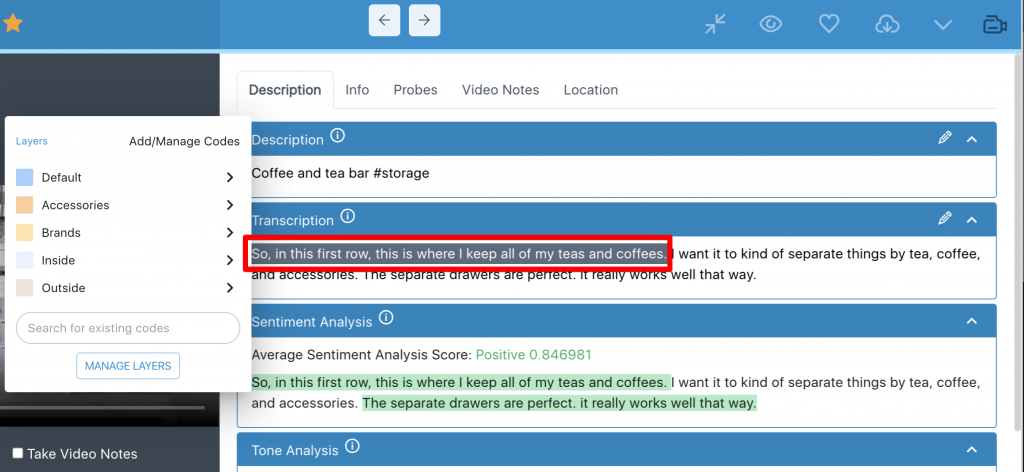
The other way to code is to highlight text in the Description, Transcription, or Probes tab. In the screenshot below, I highlighted the words “So, in this first row, this is where I keep all of my teas and coffees.” Once I stopped highlighting, I got the popup where I can now code this set of words or sentences.
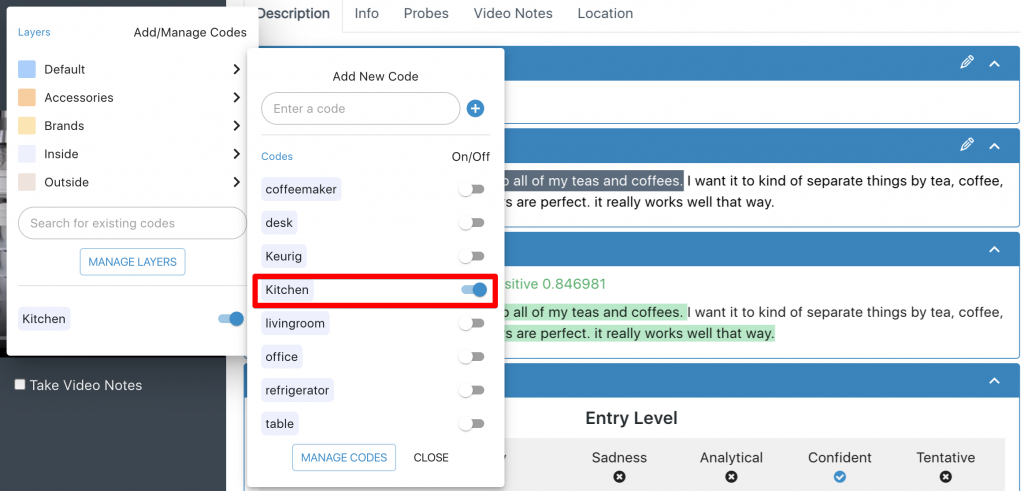
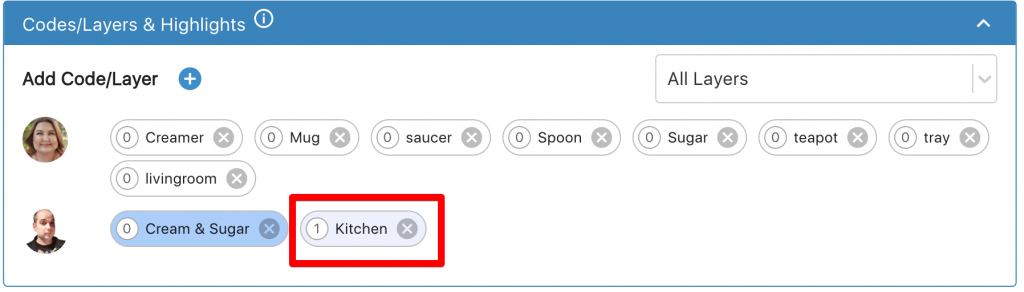
I then coded this sentence as “Kitchen,” shown below.
After you click away from the popup to close it, the words or phrases will be highlighted in the color of that layer. In the screenshot below, you will see our phrase is in the gray color that was a part of the “Inside” layer.
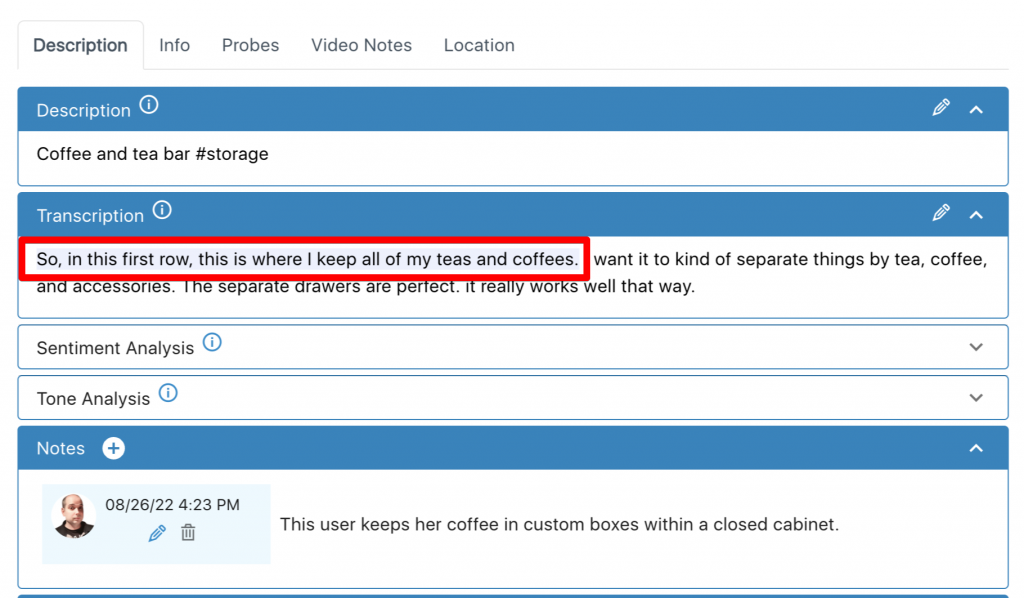
If I click off the popup, I will see “Kitchen” has been added and has a “1” next to it. The 1 indicates that this entry has been highlighted as a code 1x so far.
If you click the word “Kitchen” you will get a popup:
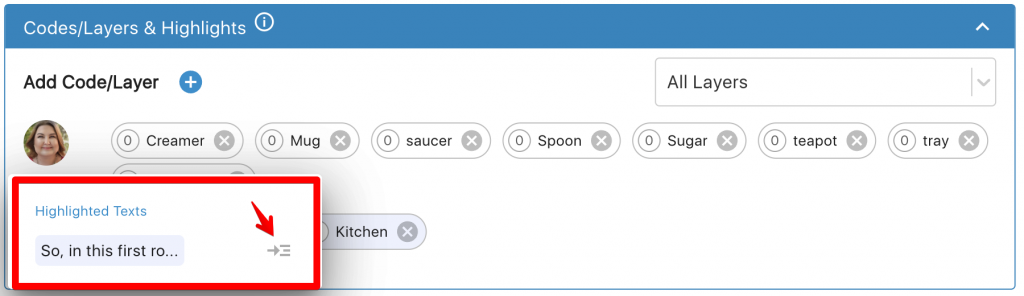
Upon clicking the icon that the red arrow is pointing to, you will be shown the area highlighted in gray, allowing you to remember the phrase you coded.

If you had highlighted a word in the Probes tab, the above icon (that the red arrow is pointing) would take you to the probes tab where you had previously highlighted text to code.
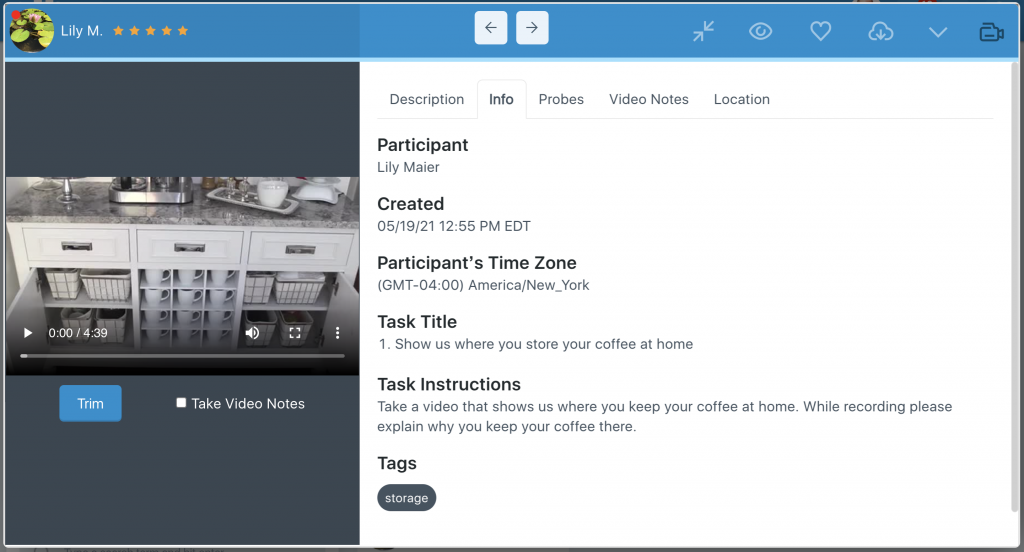
Info Tab: This tab provides the underlying details of the entry, including the participant’s name, when the entry was submitted (created), the participant’s time zone, the task title, the task instruction, tags, and task media if it’s present. Task media is the media added to a task by the moderator, and you can click on it to view it. This can be a picture or a video.
Probes Tab: This tab allows you to ask follow-up questions to the participant. If they are online, you can have a live chat conversation. If they are not online when you send them a message, they will receive a push notification plus an in-app notification, so they know to respond the next time they log in. You can highlight and code parts of a probe conversation in the same manner as described in the prior section of coding.
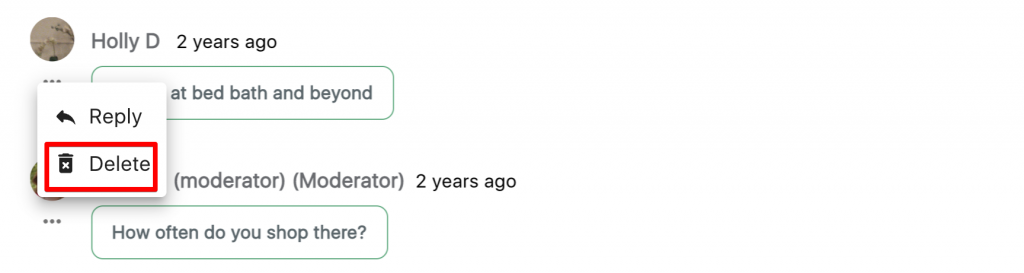
If you wish to edit or delete a probe that you, as the moderator, sent, you can do so by clicking the three dots next to your avatar. In the screenshot below, the moderator Paul C. has deleted a probe sent to a participant.
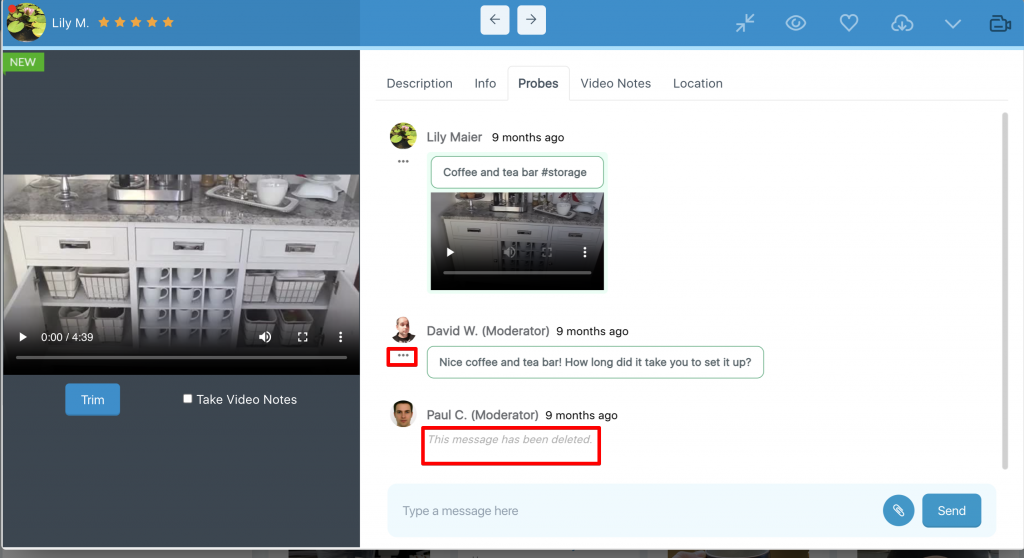
If a participant sends an inappropriate probe or one that is not relevant, you can also delete it. In the screenshot below, Holly D was the participant, and by clicking the three dots, you can delete the probe she sent.
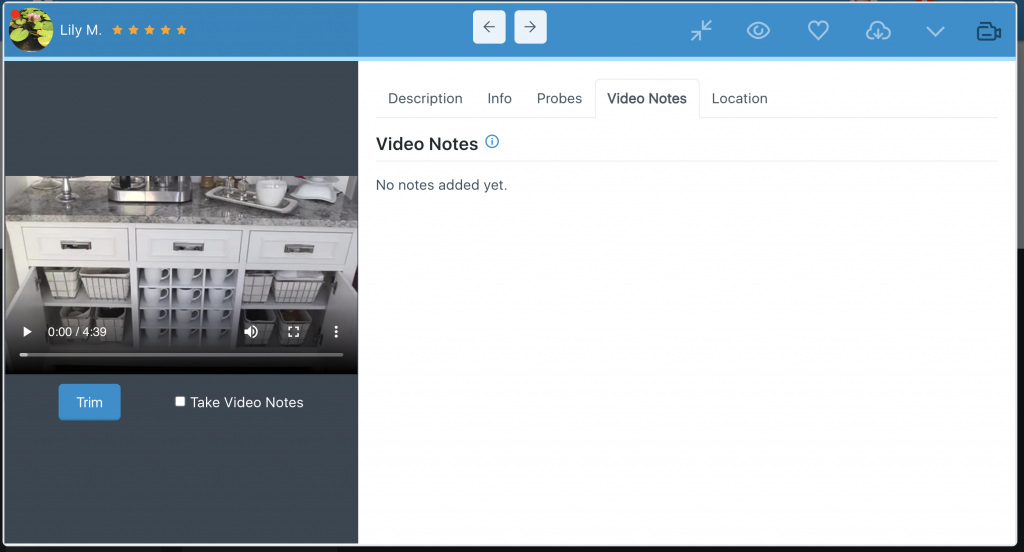
Video Notes: The video notes functionality is currently available on video files. To view the tutorial on Video Notes, please visit this page: https://helpcenter.ethosapp.com/video-notes/
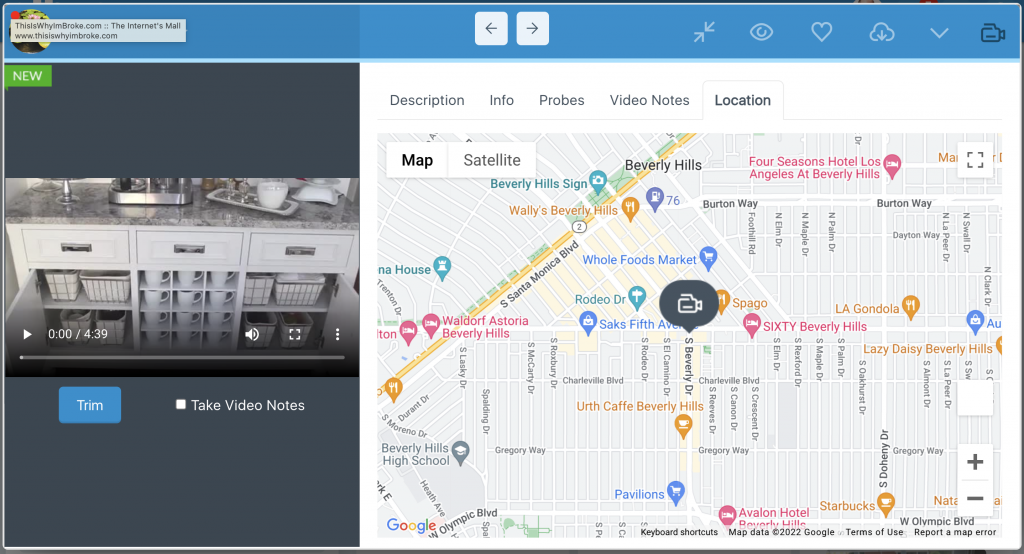
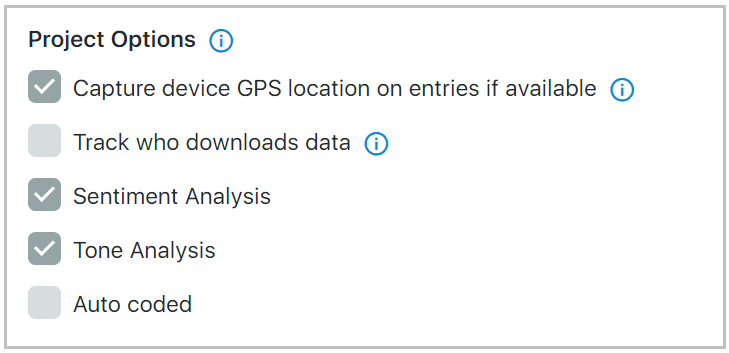
Location Tab: The location tab shows where the participant submitted the entry. Locations only show when ‘capture device GPS location on entries if available’ is selected when creating a new project. It can also be turned on within project settings after the project has been created. Location data does not show for single select, multiple, and range tasks.
Download: You can download the entry by clicking the download media icon in the top right of an expanded entry.

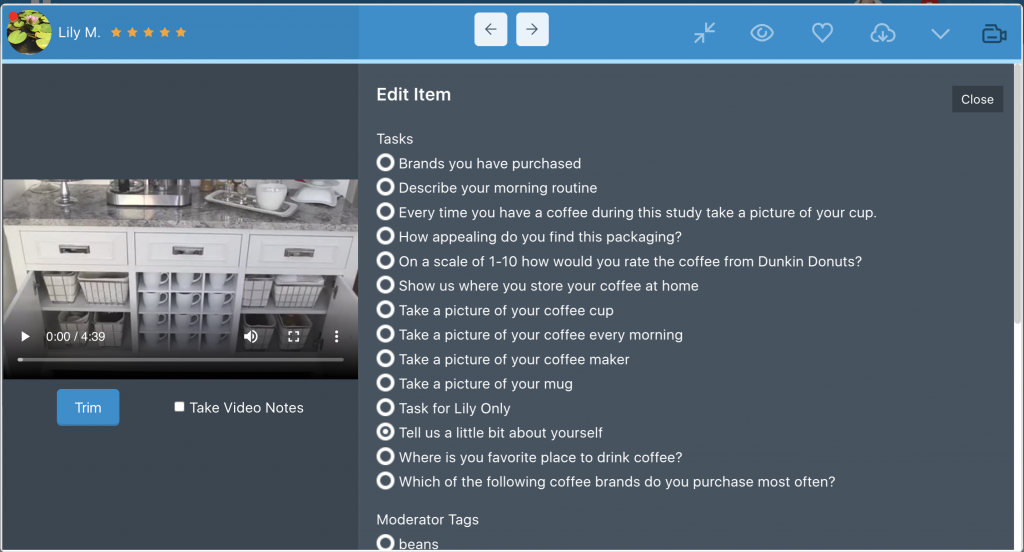
Edit: You can edit an entry by clicking the dropdown in the top right and selecting edit. Here you can update the task and tags.
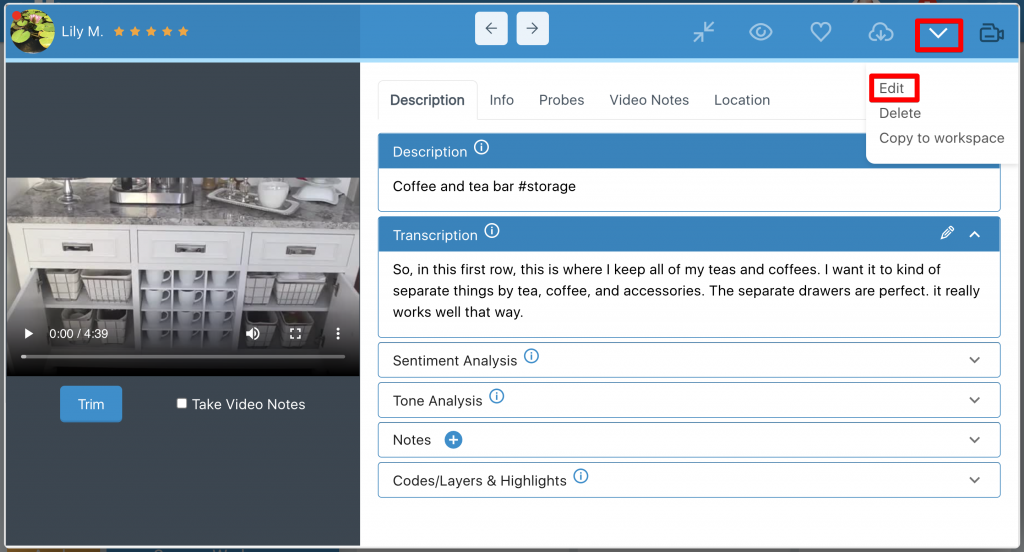
Delete: You can delete an entry by clicking the dropdown in the top right
Copy to workspace: Allows you to manually add an entry to a workspace. You can only copy entries to standard workspaces as smart workspaces are based on specific filtering criteria.
Dashboard Filtering

There are several filtering options on the left of the default dashboard view. You can run a filter by selecting the options you want and then clicking apply.
Participant: Allows you to view entries submitted by specific participants.
Media Type: You can filter by picture, video, Recording (mobile screen recording), or audio entries. An option for the media type will only appear if an entry matches the task type. Eg, If no participants submit an audio entry, it will not show up as a filtering option.
Day: Allows you to filter entries by the day of the week the entry was submitted. Days will only appear if an entry was submitted on that day. Eg, if no participants submit an entry on a Tuesday, Tuesday will not show up as a filtering option.
Time: Allows you to filter entries by time of day. Times will only appear if an entry was submitted during that time frame. Eg, if no participants submit an entry between 10:00 AM – 10:59 AM, 10:00 AM – 10:59 AM will not appear as a filtering option.
Task: Allows you to filter entries by task. If you are having participants upload multiple entries to a task (or if they submit multiple pictures, videos, etc), an additional filter will be displayed to allow you to filter by secondary uploads.
Tags (Moderator or Participant): Allows you to search by both moderator and participant tags.
Rating: Allows you to filter by star rating. Star ratings can be adjusted by any manager. Example: If you give an entry a 4-star rating, another manager can change it to 2.
External Participant Data: Allows you to run filters by external participant data if any are present. By default, this will be empty. You can add external participant data through the Admin dropdown in the top navigation. You can also add external participant data through the bulk upload feature on the Participant & User Management page. A tutorial on the page explains this process.
Sentiment Score: You can filter data by overall sentiment score: Positive, Neutral, or Negative.
Codes & Layers: Allows you to run filters by moderator codes that have been added to entries.
Additional Filters:
- Search includes tags or codes: This filter is an “or” statement and allows you to search for tags or codes that are present within an entry. You would select this option along with at least one code and at least one tag. For example, if you choose a tag named “thirsty” and a code called “cold drinks” the filter will populate entries that either have a tag of “thirsty” or a code of “cold drinks”. It will also pull entries that have both tags of “thirsty” and “cold drinks”. In comparison, if you were to run a filter (without checking this option) that only has a tag of “thirsty” and a code of “cold drinks” it would only populate entries that contained both of these items.
- Perform and search between tags: This filter is an “and” statement and allows you to search for multiple tags. You would select this option along with at least two tags. For example, if you choose the tag “thirsty” and then the tag “delicious” the filter will populate entries that have both of these tags present. In comparison, if you were to run a filter that only had a tag of “thirsty” and a tag of “delicious” the filter would populate entries that have either of these two tags.
- Perform and search between codes: This filter is an “and” statement and allows you to search for multiple codes. You would select this option along with at least two codes. For example, if you choose the code “sweet” and then the code “sour” the filter would populate entries that have both of these codes. In comparison, if you were to run a filter that only had a code of “sweet” and a code of “sour” it would populate entries that have either of these codes.
- My Likes: Allows you to see all of the entries you liked yourself.
- With Codes: Allows you to see all entries that currently have codes associated with them.
- Without Codes: Allows you to see all entries that have not been coded yet.
- With Probes: Allows you to see all entries that contain a probe conversation.
- Without Probes: Allows you to see all entries that do not have any probe conversations.
- With Notes: Allows you to see all entries that contain moderator notes.
- Without Notes: Allows you to see all entries that do not contain any moderator notes.
Search Bar: Add a word and click enter to add it as a filter. All words added to the filter through the search bar will filter through task descriptions added by participants, video/audio transcriptions, probes, and open-ended text questions. If you separate words in a search, they will display results in an “or” condition.
Running a Filter: Select all of the filtering options you want and click apply at the bottom of the filtering area.
Saving a Filter: You can save a filter by selecting ‘Save as Workspace’. Saved workspaces can be accessed through the Analysis dropdown within the top navigation. See the section on Workspaces for a full explanation of how they work.